 Honda Accord: Radiator and A/C Condenser Fan Low
Speed Circuit Troubleshooting
Honda Accord: Radiator and A/C Condenser Fan Low
Speed Circuit Troubleshooting
NOTE: • Do not use this troubleshooting procedure if the A/C compressor is inoperative. Refer to the symptom troubleshooting index.
• Before performing symptom troubleshooting, check for powertrain DTCs (see page 11-3).
1. Check the No. 3 - 6 (SUB FAN MTR) (30 A) fuse in the under-hood fuse/relay, and the No. 16 (7.5 A) fuse in the driver's under-dash fuse/relay box.
Are you fuses OK? YES
-Go to step 2.
NO
-Replace the fuse(s), and recheck. If the fuse(s) blow again, check for a short in the No. 3—6 (30 A) fuse and the No. 16 (7.5 A) fuse circuits.
2. Connect the HDS to the DLC.
3. Turn the ignition switch to ON (II).
4. Turn on the A/C.
5. Check the FAN LOW CTRL in the PGM-FI Data List with the HDS.
Is the FAN LOW CTRL on? YES
-Go to step 6.
NO
-Substitute a known-good ECM/PCM (see page 11-3), and retest. If the symptom/indication goes away with a known-good ECM/PCM, replace the original ECM/PCM (see page 11-204).
6. Turn the ignition switch to LOCK (0).
7. Remove the relay circuit board (see page 22-85) from the under-hood fuse/relay box, and test the A/C condenser fan relay (see page 22-93).
Is the relay OK? YES
-Go to step 8.
NO
-Replace the relay circuit board.
8. Turn the ignition switch to LOCK (0).
9. Reinstall the relay circuit board.
10. Jump the SCS line with the HDS.
NOTE: This step must be done to protect the engine control module/powertrain control module (ECM/PCM) from damage.
11. Disconnect ECM/PCM connector A (49P).
12. Turn the ignition switch to ON (II).
13. Measure the voltage between ECM/PCM connector A terminal No. 5 and body ground.
ECM/PCM CONNECTOR A (49P)
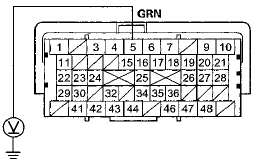
Terminal side of female terminals
Is there battery voltage? YES
-Go to step 14.
NO
-Repair an open in the wires between the under-hood fuse/relay box and the ECM/PCM, or between the No. 16 (7.5 A) fuse in driver's under-dash fuse/relay box and the under-hood fuse/relay box. If wires are OK, replace the under-hood fuse/relay box (see page 22-75).
14. Turn the ignition switch to LOCK (0).
15. Connect ECM/PCM connector A (49P) terminal No. 5 to body ground with a jumper wire.
ECM/PCM CONNECTOR A (49P)
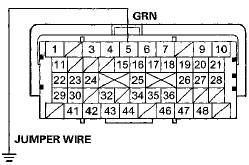
Terminal side of female terminals
16. Turn the ignition switch to ON (II).
Do the A/C condenser and radiator fans run on low? YES
-Check for loose wires or poor connections at ECM/PCM connector A (49P) terminal No. 5. If the connections are good, substitute a known-good ECM/PCM, and recheck. If the symptom/indication goes away, replace the original ECM/PCM (see page 11-204).
NO
-Go to step 17.
17. Turn the ignition switch to LOCK (0).
18. Disconnect the jumper wire.
19. Reconnect ECM/PCM connector A (49P).
20. Disconnect the radiator fan motor 2P connector.
21. Turn the ignition switch to ON (II), then set the A/C button and fan control button ON.
22. Measure the voltage between radiator fan motor 2P connectorterminal No. 2 and body ground.
RADIATOR FAN MOTOR 2P CONNECTOR
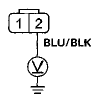
Wire side of female terminals
Is there battery voltage? YES
-Go to step 23.
NO
-Repair an open in the wire between the under-hood fuse/relay box and the radiator fan motor.
If the wire is OK, replace the under-hood fuse/relay box (see page 22-75).
23. Set the A/C button and fan control button OFF, then turn the ignition switch to LOCK (0).
24. Reconnect the radiator fan motor 2P connector.
25. Connect radiator fan motor 2P connector terminal No.
1 to body ground with a jumper wire.
RADIATOK FAN MOTOR 2P CONNECTOR
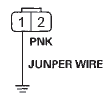
Wire side of female terminals
26. Turn the ignition switch to ON (II), then set the A/C button and fan control button ON, Does the radiator fan run? YES
-Go to step 27.
NO
-Replace the radiator fan motor (see page 10-13).
27. Set the A/C button and fan control button OFF, then turn the ignition switch to LOCK (0).
28. Disconnect the jumper wire.
29. Remove the relay circuit board (see page 22-85) from the under-hood fuse/relay box, and test the fan control relay (see page 22-93).
is the relay OK? YES
-Go to step 30.
NO
-Replace the relay circuit board.
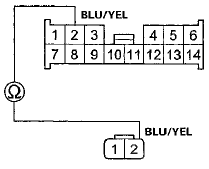
30. Disconnect the under-hood fuse/relay box connector C (5P).
31. Disconnect the radiator fan motor 2P connector.
32. Check for continuity between under-hood fuse/relay box connector C (5P) terminal No. 3 and radiator fan motor 2P connector terminal No. 1.
UNDER-HOOD FUSE/RELAY BOX CONNECTOR C (5P)
Wire side of female terminals
RADIATOR FAN MOTOR 2P CONNECTOR
Wire side of female terminals
Is there continuity? YES
-Go to step 33.
NO
-Repair an open in the wire between the under-hood fuse/relay box and the radiator fan motor.
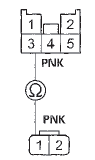
33. Disconnect under-hood fuse/relay box connector B (14P).
34. Disconnect the A/C condenser fan motor 2P connector.
35. Check for continuity between under-hood fuse/relay box connector B (14P) terminal No. 2 and A/C condenser fan motor 2P connector terminal No. 2.
UNDER-HOOD FUSE/RELAY BOX CONNECTOR B (14P)
Wire side of female terminals
A/C CONDENSER FAN MOTOR 2P CONNECTOR
Wire side of female terminals
Is there continuity? YES
-Go to step 36.
NO-
Repair an open in the wire between the under-hood fuse/relay box and the A/C condenser fan motor.
36. Check for continuity between A/C condenser fan motor 2P connector terminal No. 1 and body ground.
A/C CONDENSER FAN MOTOR 2P CONNECTOR
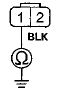
Wire side of female terminals
Is there continuity? YES
-Replace the A/C condenser fan motor (see page 10-13).
NO-
Check for an open in the wire between the A/C condenser fan motor and body ground. If the wire is OK, check for poor ground at G302 (see page 22-30).
 Radiator and A/C Condenser Fan
Common Circuit Troubleshooting
Radiator and A/C Condenser Fan
Common Circuit Troubleshooting
NOTE:
• Do not use this troubleshooting procedure if only one
fan is inoperative, or if the A/C compressor is
inoperative. Refer to the symptom troubleshooting
index.
• Before doing s ...
 A/C Condenser Fan High Speed Circuit
Troubleshooting
A/C Condenser Fan High Speed Circuit
Troubleshooting
ECM/PCM CONNECTOR A (49P)
Terminal side of female terminals
Is there battery voltage?
YES-Go to step 6.
NO-Repair an open in the wire between the
under-hood fuse/relay box and the ECM/PCM. If ...
See also:
Floor Mats
The driver’s and right rear
passenger’s floor mats that came
with your vehicle hook over the floor
mat anchors. This keeps the floor
mats from sliding forward and
possibly interfering ...
DTC Troubleshooting Index
HandsFreeLink Control Unit
...
Cam Chain Case Oil Seal
Installatio
Special Tools Required
Driver Handle, 15 x 135L 07749-0010000
Attachment, 52 x 55 mm 07746-0010400
1. Clean and dry the crankshaft oil seal.
2. Apply a light coat of new engine oil to the lip of ...