 Honda Accord: A/C Compressor Clutch Circuit
Troubleshooting
Honda Accord: A/C Compressor Clutch Circuit
Troubleshooting
NOTE: • It is normal for the A/C compressor to turn off under certain conditions, such as low idle, high engine coolant temperature, hard acceleration, or high/low refrigerant pressure.
• Do not use this troubleshooting procedure if the fans are also inoperative with the A/C on. Refer to the symptom troubleshooting index.
• Before doing any symptom troubleshooting, check for powertrain DTCs (see page 11-3). Also check for B-CAN codes (see page 22-134).
1. Check the No. 20 (7.5 A) fuse in the under-hood fuse/relay box, and the No. 16 (7.5 A) fuse in the driver's under-dash fuse/relay box.
Are the fuses OK?
YES
-Go to step2.
NO
-Replace the fuse(s) and recheck. If the fuse(s) blow again, check for a short in the No. 20 (7.5 A) fuse and the No. 16 (7.5 A) fuse circuits.
2. Connect the HDS to the DLC.
3. Start the engine.
4. Turn on the A/C.
5. Check the A/C switch in the PGM-FI data list with the HDS.
Is the A/C switch on? YES
-Go to step 6.
NO
- • '08-09 models: go to A/C pressure switch circuit troubleshooting (see page 21-54).
• '10 model: go to A/C signal circuit troubleshooting (see page 21-56).
6. Using the HDS, confirm the following values in the PGM-FI Data List at idle.
Are all the values within specifications? YES
-Go to step 7.
NO
-Troubleshoot the value that is not within the specifications.
7. Turn the ignition switch to LOCK (0).
8. Remove the A/C compressor clutch relay from the under-hood fuse/relay box, and test it (see page 22-93).
Is the relay OK? YES
-Go to step 9.
NO
-Replace the A/C compressor clutch relay.
9. Measure the voltage between A/C compressor clutch relay 4P socket terminal No. land body ground.
A/C COMPRESSOR CLUTCH RELAY 4P SOCKET

Terminal side of female terminals
Is there battery voltage? YES
-Go to step 10.
NO
-Replace the under-hood fuse/relay box (see page 22-85).
10. Connect A/C compressor clutch relay 4P socket terminal No. 1 and No. 2with a jumper wire.
A/C COMPRESSOR CLUTCH RELAY 4P SOCKET
Terminal side of female terminals
Does the A/C compressor clutch click? YES
-Go to step 11.
NO
-Go to step 20.
11. Disconnect the jumper wire.
12. Turn the ignition switch to ON (II).
13. Measure the voltage between A/C compressor clutch relay 4P socket terminal No. 4 and body ground.
A/C COMPRESSOR CLUTCH RELAY 4P SOCKET
Terminal side of female terminals
Is there battery voltage? YES
-Go to step 14.
NO
-Repair an open in the wire between the No. 16 (7.5 A) fuse in the driver's under-dash fuse/relay box and the A/C compressor clutch relay.
14. Turn the ignition switch to LOCK (0).
15. Reinstall the A/C compressor clutch relay.
16. Jump the SCS line with the HDS.
NOTE: This step must be done to protect the engine control module/powertrain control module (ECM/PCM) from damage.
17. Disconnect ECM/PCM connector A (49P).
18. Connect ECM/PCM connector A (49P) terminal No. 15 to body ground with a jumper wire.
ECM/PCM CONNECTOR A (49P)
Terminal side of female terminals
19. Turn the ignition switch to ON (II).
Does the A/C compressor click? YES
-Check for loose wires or poor connections at ECM/PCM connector A (49P). If the connections are good, check the ECM/PCM grounds. If the grounds are good, substitute a known-good ECM/PCM, and recheck. If the symptom/indication goes away, replace the original ECM/PCM (see page 11-204).
NO-
Repair an open in the wire between the A/C compressor clutch relay and the ECM/PCM.
20. Disconnect the jumper wire.
21. Disconnect the A/C compressor clutch 1P connector.
22. Check for continuity between A/C compressor clutch relay 4P socket terminal No. 2 and A/C compressor clutch 1P connector terminal No. 1.
A/C COMPRESSOR CLUTCH RELAY 4P SOCKET
Terminal side of female terminals
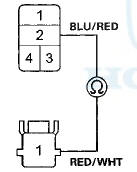
A /C COMPRESSOR CLUTCH 1P CONNECTOR
Wire side of female terminal
Is there continuity? YES
-Check the A/C compressor clutch clearance, and the compressor clutch field coil (see page 21-73).
Repair as needed.
NO
-Repair an open in the wire between the A/C compressor clutch relay and the A/C compressor clutch.
 A/C Condenser Fan High Speed Circuit
Troubleshooting
A/C Condenser Fan High Speed Circuit
Troubleshooting
ECM/PCM CONNECTOR A (49P)
Terminal side of female terminals
Is there battery voltage?
YES-Go to step 6.
NO-Repair an open in the wire between the
under-hood fuse/relay box and the ECM/PCM. If ...
 A/C Pressure Switch Circuit
Troubleshooting
A/C Pressure Switch Circuit
Troubleshooting
NOTE:
• Do not use this troubleshooting procedure if any of the
following items are operative: The condenser fan, the
radiator fan, or the A/C compressor, or if the heater is
inoperative. Ref ...
See also:
Radio Data System (RDS)
On the FM band, you can select a
favorite station and display the
program service name provided by
the radio data system (RDS).
RDS INFO Display
The RDS information display
function shows th ...
Console Accessory Power Socket
Test/Replacement
NOTE: If all of the front and console accessory power
sockets do not work, check the No. 1 8 (7.5 A) fuse in the
driver's under-dash fuse/relay box and ground (G503)
first.
1. Remove the center ...
Component Location Index
4-door
2-door
...