 Honda Accord: Washer Reservoir Replacement
1. Remove the right inner fender (see page 20-290).
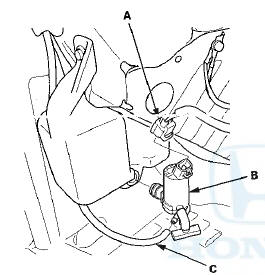
2. Disconnect the 2P connector(s) (A) from the washer motor (B) and the washer fluid level switch (Canada models).
Washer Reservoir Capacity:
2.5 L (2.64 US qt): USA models
4.5 L (4.75 US qt): Canada models
USA models
Canada models
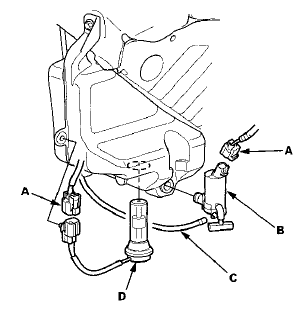
3. Disconnect the washer tube (C), then if necessary, remove the washer motor and the washer fluid level switch (D) (Canada models).
NOTE: Fluid may flow out of the opening.
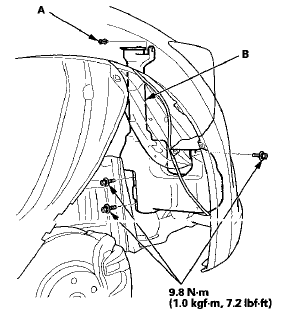
4. Remove the clip (A) and three bolts from the washer reservoir (B).
5. Install the washer reservoir in the reverse order of removal. Check the washer motor operation.
 Wiper Motor Replacement
Removal
1. Open the hood. Remove the caps (A) and nuts (B).
NOTE: The illustration shows 4-door.
2. Close the hood, then spread protective cloths (A) on
the hood to avoid scratching the hood e ...
 Wiper Blade Replacement
Removal
1. Lift the wiper arms off the windshield.
2. Pull up and hold the tab (A), and slide the wiper blade
assembly (B) toward the tabs until it releases from the
wiper arm (C).
NOTE: The ...
See also:
Rear Door Glass and Regulator
Replacement
4-door
NOTE: Put on gloves to protect your hands.
1. Remove the door panel (see page 20-38).
2. Disconnect the power door lock actuator connector
(A), and detach the harness clips (B). Remove ...
Shift Lever Does Not Move
Follow the procedure below if you cannot move the shift lever out of the
position.
• Releasing the Lock
1. Set the parking brake.
2. Remove the key from the ignition switch.
2. Remove ...
Cylinder Head
Component Location Index (cont'd)
Engine Compression Inspection
NOTE: After this inspection, you must reset the engine
control module (ECM)/powertrain control module
(PCM), otherwise the ECM ...