 Honda Accord: Trim Removal/Installation - Trunk Area
Special Tools Required
KTC Trim Tool Set SOJATP2014*
* Available through the Honda Tool and Equipment Program; call 888-424-6857
NOTE: - Put on gloves to protect your hands.
- Take care not to bend or scratch the trim or the panels.
- Use the appropriate tool from the KTC trim tool set to avoid damage when removing components.
1. Fold down the rear seat-back.
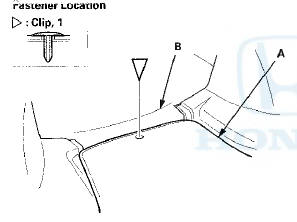
2. Remove the clip that secures the trunk floor (A) and the seat-back cover (B) to the body. 2-door is shown; 4-door is similar.
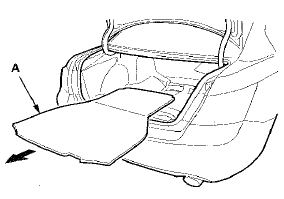
3. Remove the trunk floor (A). 4-door is shown; 2-door is similar.
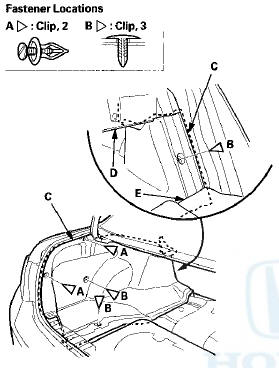
4. Remove the trunk lid weatherstrip near the trunk rear trim panel.
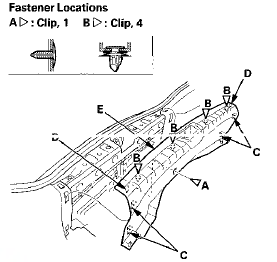
5. Detach the clips (A, B), and release the hooks (C) and the tabs (D) by pulling up the rear trim panel (E), then lemove the panel.
2-door
4-door
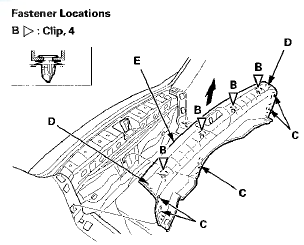
6. Detach the clips (A, B), and pull out the trunk side trim panel (C) from under the rear shelf (D) and the rear seat-back (E), then remove the panel. 4-door is shown; 2-door is similar.
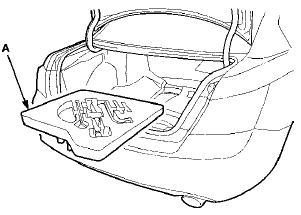
7. Remove the tool box spacer (A). 4-door is shown; 2-door is similar.
8. Remove the spare tire.
9. Detach the clips, then remove the spare tire pan carpet (A). 4-door is shown; 2-door is similar.
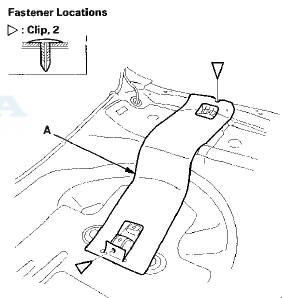
10. Detach the clips (A) and the harness holders (B) from the stud bolts, then remove the rear wheelhouse insulator (C). 4-door is shown; 2-door is similar.

11. Install the trim in the reverse order of removal, and note these items: - If the clips are damaged or stress-whitened, replace them with new ones.
- Push the clips and the hooks into place securely.
 Trim Removal/Installation - Rear Shelf Area
Special Tools Required
KTC Trim Tool Set SOJATP2014*
*Available through the Honda Tool and
Equipment
Program; call 888-424-6857
Rear Shelf
SRS components are located in this area. Review the
S ...
 Trim Removal/Installation - Trunk
Lid
Trim Removal/Installation - Trunk
Lid
Special Tools Required
KTC Trim Tool Set SOJATP2014*
*Available through the Honda Tool and
Equipment
Program; call 888-424-6857
NOTE:
- Put on gloves to protect your hands. .
- Take care not ...
See also:
Security System Alarm
The security system alarm activates when the doors, trunk, or hood are opened
without the key, remote transmitter, or smart entry system.
The security alarm continues for a maximum of two
minutes ...
Cleaning the Seat Belts
If your seat belts get dirty, use a soft
brush with a mixture of mild soap
and warm water to clean them. Do
not use bleach, dye, or cleaning
solvents. Let the belts air dry before
you use ...
Immobilizer Key Registration
NOTE:
• The HDS is required for registration of the immobilizer
keys.
• Programming the immobilizer also programs the
keyless transmitter.
• Check for aftermarket electrical eq ...