 Honda Accord: Transmission End Crankshaft Oil
Seal Installation - In Car.
Honda Accord: Transmission End Crankshaft Oil
Seal Installation - In Car.
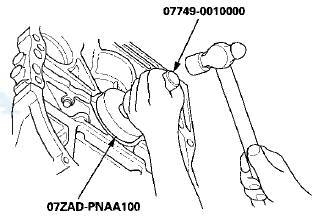
Special Tools Required
Driver Handle, 15 x 135L 07749-0010000
Oil Seal Driver Attachment, 96 mm 07ZAD-PNAA100
1 Remove the transmission: - Manual transmission (see page 13-7) - Automatic transmission (see page 14-194) 2. M/T model: Remove the flywheel (see step 17 on page 12-18), the clutch disc (see step 8 on page 12-16), and the pressure plate (see step 3 on page 12-15).
3. A/T model: Remove the drive plate (see page 14-204).
4. Clean and dry the crankshaft oil seal housing.
5. Apply a light coat of new engine oil to the lip of the crankshaft oil seal.
6. Use the driver handle, 15 x 135L and the oil seal driver attachment 96 mm to drive a new crankshaft oil seal squarely into the engine block to the specified installed height.
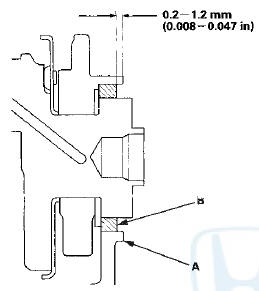
7. Measure the distance between the engine block (A)
and the crankshaft oil seal (B).
Oil Seal Installed Height: 0.2-1.2 mm
(0.008-0.047 In)
8. M/T model: Install the flywheel (see step 18 on page 12-18), the clutch disc (see step 26 on page 12-19), and the pressure plate (see step 27 on page 12-19).
9. A/T model: Install the drive plate (see page 14-204).
10. Install the transmission: - Manual transmission (see page 13-15) - Automatic transmission (see page 14-205)
 Oil Pan Installation
1. Remove all of the old liquid gasket from the oil pan
mating surfaces, the bolts, and the bolt holes.
2. Clean and dry the oil pan mating surfaces.
3. Apply liquid gasket, P/N 08717-0004,0871 ...
 Sealing Bolt Installation
NOTE: When installing the sealing bolt (A), always use a
new washer.
...
See also:
Sun Visor
To use the sun visor, pull it down.
When using the sun visor for the
side window, remove the support rod
from the clip, and swing it out.
In this position, the sun visor can be
adjusted by m ...
Adjusting the Sound
1. Press the SETTINGS button.
2. Rotate to select Audio
Settings, then
press .
3. Rotate to select Sound,
then press .
Rotate to scroll through the
following
choices:
The SVC ...
Evaporator Temperature Sensor Test
NOTE: Before testing the sensor, check for HVAC DTCs
(see page 2 1 - 9).
1. Remove the evaporator temperature sensor (see
page 21-67).
2. Dip the sensor in ice water, and measure the
resistan ...