 Honda Accord: Shift Fork Clearance Inspection
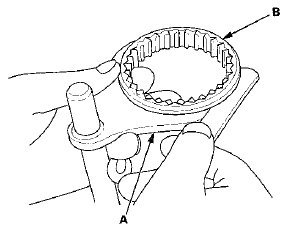
1. Measure the clearance between each shift fork (A) and its matching synchro sleeve (B). If the clearance exceeds the service limit, go to step 2.
Standard: 0.35-0.65 mm (0.014-0.026 inj
Service Limit: 1.0 mm (0.04 in)
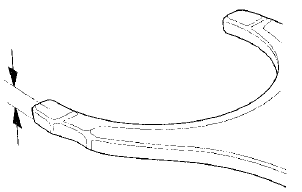
2. Measure the thickness of the shift fork fingers.
- If the thickness is not within the standard, replace . the shift fork.
- If the thickness is within the standard, replace the synchro sleeve and the synchro hub as a set.
- If one arm of the shift fork shows more wear than others, the fork may be bent and needs to be replaced.
Standard: 7.4-7.6 mm (0.29-0.30 in)
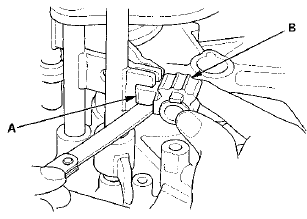
3. Measure the clearance between the shift fork (A) and the shift arm (B). If the clearance exceeds the service limit, go to step 4.
Standard: 0.2-0.5 mm (0.01 - 0 . 0 2 in)
Service Limit: 0.6 mm (0.02 in)
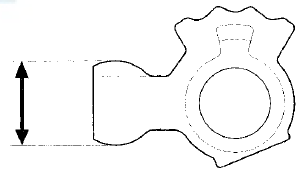
4. Measure the width of the shift arm.
- If the width is not within the standard, replace the shift arm.
- If the width is within the standard, replace the shift fork.
Standard: 16.9-17.0 mm (0.665-0.669 in)
 Change Lever Assembly Disassembly/Reassembly
NOTE: Prior to reassembling, clean all the parts in solvent, dry them, and
apply grease to contact surfaces as shown. Do
not wash the rubber parts with solvent.
...
 Shift Fork Disassembly/Reassembly
NOTE: Prior to reassembling, clean all the parts in solvent, dry them, and
apply MTF to all contact surfaces
...
See also:
Special Tools
...
Subframe Replacement
Special Tools Required
Subframe Alignment Pin 070AG-SJAA10S
Front Subframe Torque
After removing the subframe mounting bolts, the front subframe middle rubber
mount mounting bolts, the front
sub ...
Carrier Bearing Replacement
Special Tools Required
Attachment, 40 x 50 mm 07LAD-PW50601
NOTE:
-The bearing and the bearing outer race should be
replaced as a set.
-Inspect and adjust the carrier bearing
preload
wheneve ...