 Honda Accord: Change Lever Assembly Disassembly/Reassembly
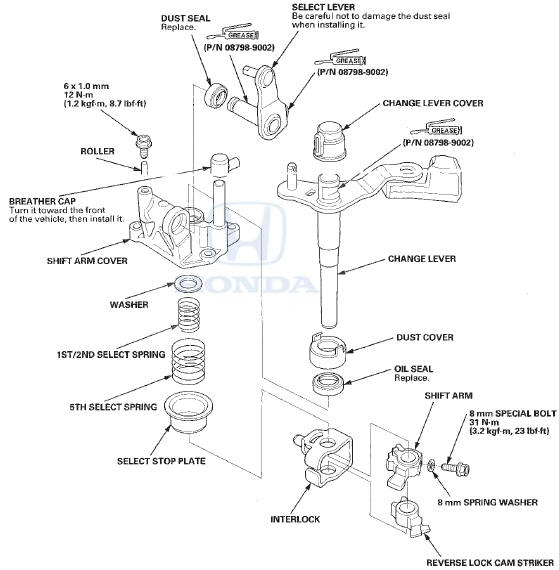
NOTE: Prior to reassembling, clean all the parts in solvent, dry them, and apply grease to contact surfaces as shown. Do not wash the rubber parts with solvent.
 Change Lever Clearance Inspection
1. Measure the clearance between the change lever (A)
and the select lever (B) with a feeler gauge (C). If the
clearance exceeds the service limit, go to step 2.
Standard: 0.05-”0.25 mm (0.002 ...
 Shift Fork Clearance Inspection
1. Measure the clearance between each shift fork (A)
and its matching synchro sleeve (B). If the clearance
exceeds the service limit, go to step 2.
Standard: 0.35-0.65 mm (0.014-0.026 inj
Service ...
See also:
Vehicle Identification Number
Manufacturer, Make, and Type of Vehicle
1HG: Honda of America Mfg., Inc.
Honda passenger vehicle
JHM: Honda Motor Co., Ltd.
Honda passenger vehicle
Line, Body, and Engine Type
CP2: Accord/ ...
Symptom Troubleshooting Index
When the vehicle has one of these symptoms, check for VSA diagnostic trouble
codes (DTCs) with the HDS. If there are
no DTCs, do the diagnostic procedure for the symptom, in the sequence listed,
...
Door Striker Adjustment
Make sure the door latches securely without slamming
it. If necessary, adjust the striker (A): The striker nuts are
fixed, but the striker can be adjusted slightly up or down,
and in or out.
1. ...