 Honda Accord: Piston, Pin, and Confyssfeg EQC
Replacement
Honda Accord: Piston, Pin, and Confyssfeg EQC
Replacement
Disassembly
1. Remove the piston from the engine block (see page 7-14).
2. Apply new engine oil to the piston pin snap rings (A), and turn them in the ring grooves until the end gaps are lined up with the cutouts in the piston pin bores (B).
NOTE: Take care not to damage the ring grooves.
3. Remove both snap rings. Start at the cutout in the piston pin bore. Remove the snap rings carefully so they do not go flying or get lost. Wear eye protection.
4. Heat the piston and the connecting rod assembly to about 158 Р’В°F (70 Р’В°C), then remove the piston pin.
Inspection
NOTE: Inspect the piston, the piston pin, and the connecting rod when they are at room temperature.
1. Measure the diameter of the piston pin.
Piston Pin Diameter
Standard (New): 21.961 -21.965 mm
(0.8646-0.8648 in)
Service Limit: 21.953 mm (0.8643 in)
3. Check the difference between the piston pin diameter and the piston pin hole diameter in the piston.
Piston Pin-to-Piston Clearance
Standard (New): -0.005-”0.002 mm
(-0.0002-0.0001 in)
Service L i m i t : 0.005 mm (0.0002 in)
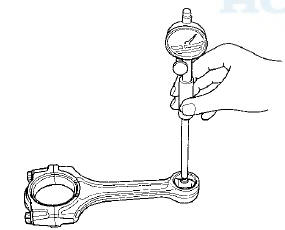
4. Measure the piston pin-to-connecting rod clearance.
Piston Pin-to-Connecting Rod Clearance
Standard (New): 0.005-”0.015 mm
(0.0002-0.0006 in)
Service Limit: 0.02 mm (0.001 in)
Reassembly
1. Install a piston pin snap ring (A).
2. Coat the piston pin bore in the piston, the bore in the connecting rod, and the piston pin with new engine oil.
3. Heat the piston to about 158 Р’В°F (70 Р’В°C).

4. Assemble the piston (A) and the connecting rod (B) with the arrow (C) and the embossed mark (D) on the same side. Install the piston pin (E).
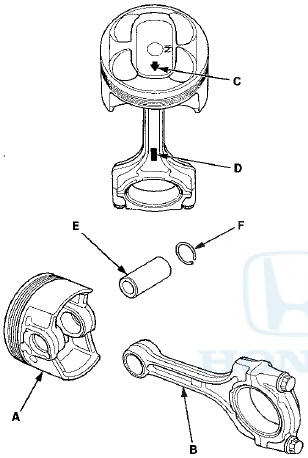
5. Install the remaining snap ring (F).
8. Turn the snap rings in the ring grooves until the end gaps are positioned at the bottom of the piston.
 Cf Hinder Bore Honing
Only a scored or scratched cylinder bore must be honed.
1. Measure the cylinder bores (see page 7-17).
If the engine block is to be reused, hone the cylinders,
and remeasure the bores.
2. Re ...
 Piston Ring Replacement
1. Remove the piston from the engine block (see page
7-14).
2. Using a ring expander (A), remove the old piston
rings (B).
3. Clean all ring grooves thoroughly with a squared-off
broken ring ...
See also:
Driver's Power Seat Motor Test
1. Remove the d r i v e r ' s seat (see page 20-194).
2. Remove t h e p o w e r seat adjustment switch knobs a nd
t h e recline cover f r om t h e seat.
• 4-door (see page 20-234)
• ...
Driver's Airbag Replacement
NOTE: If replacing the driver's airbag after deployment,
refer to Component Replacement/Inspection After
Deployment (see page 24-208) for a complete list of.
other parts that must also be replace ...
Countershaft Reverse Selector Hub and
3rd Gear Installation
Special Tools Required
Driver Handle, 40 mm I.D. 07746-0030100
1. Install 2nd gear, 1st gear, 5th gear, and the
37 x 41 x 54.3 mm collar on the countershaft.
2. Slide 3rd gear (A) over the count ...