 Honda Accord: Instrument Visor Removal/Installation
Special Tools Required
KTC Trim Too! Set SOJATP2014*
*Available through the Honda Tool a n d Equipment Program; call 888-424-6857
NOTE: - Take care not to scratch the dashboard or the related parts.
- Use the appropriate tool from the KTC trim tool set to avoid damage when removing components.
1. Adjust the steering column to the full tilt down position.
2. Detach the clips fastening the column blind cover (A) from the upper column cover (B) by hand.

3. If necessary, release the hooks (A), then remove the column blind cover (B) from the instrument visor (C).
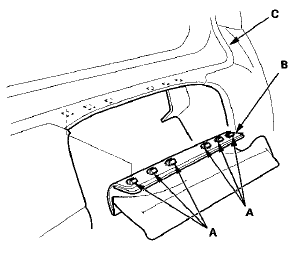
4. Gently pull out along the edge of the instrument visor (A) to detach the clips (B, C) and release the hooks (D, E), and release the hooks (E) by pulling out the visor, then remove the visor.
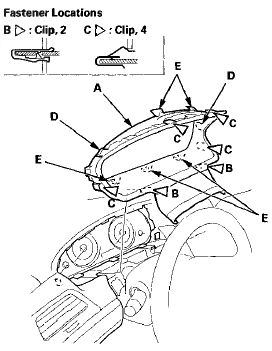
5. Install the visor in the reverse order of removal, and note these items: - If the clips are damaged or stress-whitened, replace them with new ones.
- Push the clips and the hooks into place securely
 Dashboard
...
 Driver's Dashboard Lower Cover
Removal/Installation
Driver's Dashboard Lower Cover
Removal/Installation
Special Tools Required
KTC Trim Tool Set SOJATP2014*
* Available through the Honda Tool and
Equipment
Program; call 888-424-6857
NOTE;
- Take care not to scratch the dashboard or the related
p ...
See also:
Differential Thrust Clearance Adjustment
Special Tools Required
Driver Handle, 40 mm I.D. 07746-0030100
1 Remove trie left driveshaft side oil seal from the
transmission housing (see page 13-70).
2. If you removed the 80 mm shim from t ...
Fuel Line/Quick-Connect Fitting
Removal
NOTE: Before you work on the fuel lines and fittings,
read the Fuel Line/Quick-Connect Fitting Precautions
(see page 11-313).
1. If equipped, remove the quick-connect fitting cover
from the fuel ...
Bluetooth® HandsFreeLink®
Bluetooth® HandsFreeLink® (HFL) allows you to place and receive phone calls
using
your vehicle’s audio system, without handling your cell phone.
Using HFL
• HFL Buttons
(Pick-up) b ...