 Honda Accord: Installing a Child Seat with LATCH
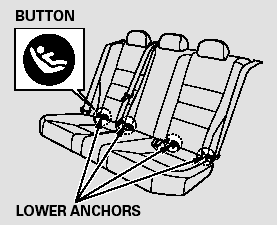
Your vehicle is equipped with LATCH (Lower Anchors and Tethers for CHildren) at the outer rear seats.
The lower anchors are located between the seat-back and seat bottom, and are to be used only with a child seat designed for use with LATCH.
The location of each lower anchor is indicated by a small button above the anchor point.
To install a LATCH-compatible child seat:
1. Move the seat belt buckle or tongue away from the lower anchors.
2. Make sure there are no objects near the anchors that could prevent a secure connection between the child seat and the anchors.
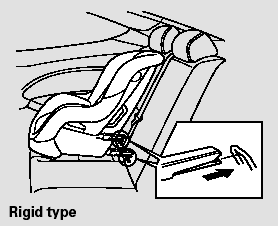
3. Place the child seat on the vehicle seat, then attach the seat to the lower anchors according to the child seat maker’s instructions.
Some LATCH-compatible seats have a rigid-type connector as shown above.
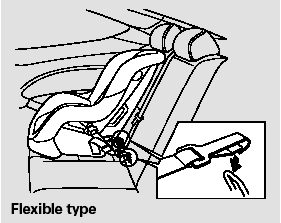
Other LATCH-compatible seats have a flexible-type connector as shown above.
4. Whatever type you have, follow the child seat maker’s instructions for adjusting or tightening the fit.
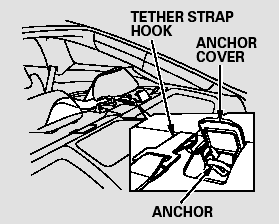
5. Lift the head restraint, then route the tether strap through the legs of the head restraint and over the seat-back, making sure the strap is not twisted.
6. Open the anchor cover.
7. Attach the tether strap hook to the tether anchor, then tighten the strap as instructed by the child seat maker.
8. Push and pull the child seat forward and from side-to-side to verify that it is secure.
 Installing a Child Seat
After selecting a proper child seat
and a good place to install the seat,
there are three main steps in
installing the seat:
1. Properly secure the child seat to
the vehicle. All child seats ...
 Installing a Child Seat with a Lap/Shoulder Belt
When not using the LATCH system,
all child seats must be secured to the
vehicle with the lap part of a lap/
shoulder belt.
In addition, the lap/shoulder belts in
all seating positions except ...
See also:
Driving Preparation
Check the following items before you start driving.
• Exterior Checks
• Make sure there are no obstructions on the windows, door mirrors, exterior
lights, or other parts of the vehicle.
&nbs ...
Parking Brake
To apply the parking brake, pull the
lever up fully. To release it, pull up
slightly, push the button, and lower
the lever. The parking brake
indicator on the instrument panel
should go ou ...
Carbon Monoxide Hazard
Your vehicle’s exhaust contains
carbon monoxide gas. Carbon
monoxide should not enter the
vehicle in normal driving if you
maintain your vehicle properly and
follow the information on this ...