 Honda Accord: Dashboard/Steering Hanger Beam
Removal/Installation
Honda Accord: Dashboard/Steering Hanger Beam
Removal/Installation
Special Tools Required
KTC Trim Tool Set SOJATP2014*
*Available through the Honda Tool and Equipment Program; call 888-424-6857
SRS components are located in this area. Review the SRS component locations, 2-door (see page 24-23), 4-door (see page 24-21) and the precautions and procedures (see page 24-25) before doing repairs or..
service.
NOTE: - Have an assistant help you when removing and installing the dash boa rd/steeri ng hanger beam.
- Put on gloves to protect your hands.
- Take care not to scratch the dashboard, the body, or the related parts.
- Take care not to bend the brackets.
- Use the appropriate tool from the KTC trim tool set to avoid damage when removing components.
1. Do the battery terminal disconnection procedure (see page 22-91), then wait at least 3 minutes before beginning work.
2. Remove these items: - Kick panels, both sides: - 2-door (see page 20-105) - 4-door (see page 20-107) - A-pillar trim, both sides (see page 20-110) - Center console (see page 20-158) - Driver's dashboard lower cover (see page 20-166) - Dashboard center lower cover, both sides (see page 20-170) - Glove box (see page 20-174) - Steering column (see page 17-10) - M/T: Shift lever housing (see page 13-65) - A/T: Shift lever (see page 14-222)
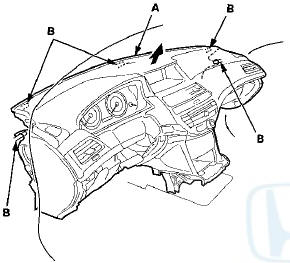
Driver's side
3. From under the dash, disconnect the left engine compartment wire harness connectors (A), the driver's door wire harness connector (B), the roof wire harness connectors (C), and the left side wire harness connector (D), and disconnect the left engine compartment wire harness connectors (E) and the left side wire harness connector (F) from the driver's under-dash fuse/relay box (G).
4. With climate control: From under the dash, disconnect the air hose (A), then remove it.
Middle area (shift lever area)
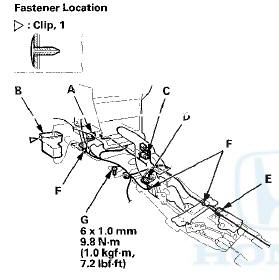
5. Remove the clip, and remove the left rear heater joint duct (B). Disconnect the floor wire harness connector (C), the SRS unit connector A , the parking brake switch connector (D), and the yaw rate-lateral acceleration sensor connector (E), and detach the wire harness clips (F). Remove the ground bolt (G) with a TORX T30 bit.
Middle area (passenger's side)
6. From under the dash, disconnect the A/C wire harness connector (A).

Passenger's side
7. From under the dash, disconnect the passenger's door wire harness connector (A), the right side wire harness connectors (B), the antenna lead connector (C), and the right engine compartment wire harness connectors (D). Disconnect the dashboard wire harness connectors (E) and the audio wire harness connector (F) from the passenger's under-dash fuse/relay box (G). Detach the harness clip (H).
8. With premium sound system: Disconnect the stereo amplifier connectors (I).
9. Detach all of the harness and the connector clips.
10. Detach the harness clip (A) and the clip fastening the relay (B) from the brake pedal support member (C).
Remove the bolts (D, E), then remove the member, and disconnect the TPMS control unit connector (F).

11 Remove the center frame mounting bolts (A) and the center joint mounting bolts (B), then remove the center joint bracket (C).
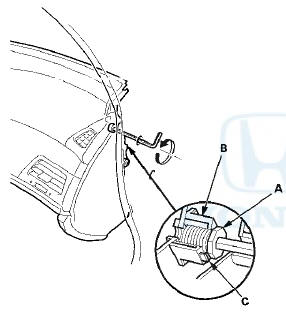
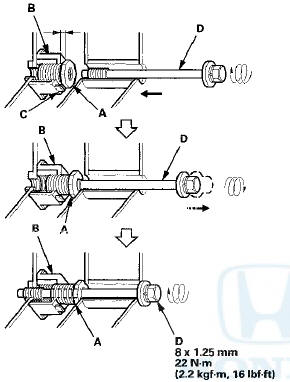
12. Remove the special bolts (A) from outside the passenger's door.
-1. Remove the caps (B).
-2. Loosen the special bolts until they disengage from the threads on the hanger beam side bracket (C), and engage the inside threads of the collar bolts (D).
The thread lock on the special bolts makes the special bolts and collar bolts turn together.
-3. Continue loosening the special bolts to turn the collar bolts into the fixed space adjusters (E) until the collar bolts engage the stoppers (F). This creates a gap (G) between the collar bolts and the body.
-4. Loosen the special bolts to disengage them from the collar bolts, then remove them.
13. Check that the collar bolts (A) are seated in the fixed space adjuster (B).
-1. Insert an 8 mm hex wrench in the collar bolt.
-2. Gently turn the wrench counterclockwise.
-3. If the wrench turns easily, continue turning until the collar bolt seats and engages the stopper (C).
-4. If the wrench does not turn easily, the collar bolt is seated.
NOTE: If either collar bolt was not seated, replace the special bolts.
14. From outside the driver's door, remove the caps (A), then remove the dashboard mounting bolts (B).
15. From under the dash, remove the mounting bolts (C).
16. Lift up on the dashboard (A) to release it from the guide pins (B). Carefully remove the dashboard through the front door opening. Take care not to scratch the body with the collar nuts on the passenger's side.
NOTE: Do not rest the dashboard on its lower center cover opening, or it may be damaged. Lay it on its front or back.
17. Install the dashboard in the reverse order of removal, and note these items: - Make sure the dashboard fits onto the guide pins correctly
- Before tightening the bolts, make sure the wire harnesses are not pinched.
- If the clips are damaged or stress-whitened, replace them with new ones.
- Push the clips into place securely.
- Make sure the connectors are plugged in properly, e Make sure the collar bolts (A) turn easily by hand in the fixed space adjusters (B). Tighten the collar bolts by hand until they engage the stoppers (C) before reinstalling the dashboard.
- Before reinstalling the dashboard, screw the special bolts (D) into the collar bolts, and check that they turn together. If they do not turn together, replace the special bolts.
- After setting the dashboard in the body, reinstall all of the mounting bolts but do not tighten them. First tighten the driver's side bracket bolts to the specified torque. Next, tighten the special bolts to turn the collar bolts out of the space adjusters until the collar bolts contact the body. Continue tightening the special bolts to the specified torque.
- Tighten all remaining mounting bolts to the specified torque.
- Apply medium strength liquid thread lock to the bolts securing the center joint bracket and the dashboard before reinstallation.
- After tightening the dashboard mounting bolts, tighten the center joint bracket mounting bolts, and then tighten the center frame mounting bolts.
- Do the battery terminal reconnection procedure (see page 22-91).
- If necessary, adjust the shift cable (see page 14-232).
- Check for any DTCs that may have been set during repairs, and clear them.
Special bolt tightening on passenger's side
 Column Cover Removal/Installation
NOTE:
- Put on gloves to protect your hands.
- Take care not to scratch or damage the column covers.
- Do not pry the cover surface with any tools.
1. Adjust the steering column to the full ...
 Dashboard/Steering Hanger Beam
Disassembly/Reassembly
Dashboard/Steering Hanger Beam
Disassembly/Reassembly
Special Tools Required
KTC Trim Tool Set SOJATP2014*
*Available through the Honda Tool and
Equipment
Program; call 888-424-6857
NOTE:
- Put on gloves to protect your hands.
В© Take care no ...
See also:
XM Radio Display Messages
‘‘LOADING’’ - XM is loading the audio or program information.
‘‘OFF AIR’’ - The channel currently selected is no longer
broadcasting.
‘‘UPDATING’’ - The encryption code is ...
Tire and Wheel Replacement
Replace your tires with radials of the same size, load range, speed rating,
and
maximum cold tire pressure rating (as shown on the tire’s sidewall). Using tires
of a
different size or constr ...
Front HFL-Navigation-ANC
Microphone
Removal/Installation
NOTE:
• Put on gloves to protect your hands.
• Take care not to scratch the dashboard and related
parts.
• Lay a workshop towel under the parts when working
on them to protect ...