 Honda Accord: Wiper Motor Replacement
Removal
1. Open the hood. Remove the caps (A) and nuts (B).
NOTE: The illustration shows 4-door.
2. Close the hood, then spread protective cloths (A) on the hood to avoid scratching the hood edge.
NOTE: The illustration shows 4-door.
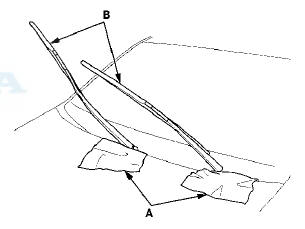
3. Raise the wiper arms (B) off the windshield, then remove the wiper arms.
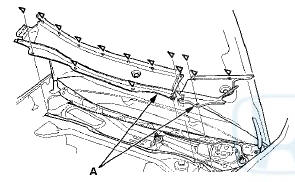
4. Remove the hood seal and cowl covers (A).
NOTE: The illustration shows 4-door.
5. Disconnect the harness clip and 5 P connector (A) from the windshield wiper motor (B).
4-door
6. Remove the four bolts and wiper linkage assembly (C).
7. Separate the linkage (A) from the link (B).
4-door
2-door
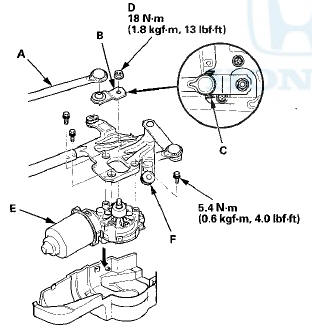
8. Note the position (C), then remove the nut (D) and the link from the windshield wiper motor (E).
9. Remove the three bolts, and separate the windshield wiper motor from the linkage (F).
Installation
1 Before installing the motor, connect the 5P connector to the windshield wiper motor, and turn the wiper/washer switch ON to (LO) or (HI) position, then OFF to return the motor shaft to the park position.
NOTE: • Do not use the wiper/washer switch (INT) position in this step.
• If necessary, replace any damaged clips.
• Apply multipurpose grease to the moving parts.
2. Install the wiper motor to the windshield wiper linkage assembly in the reverse order of removal.
3. Install the link to the windshield wiper motor shaft, then align the mark (A) of the link and the mark (B) of the wiper linkage assembly (4-door), or align the link (A) and the mark (B) of the wiper linkage assembly (2-door).
4-door
2-door
4. After installation, adjust the wiper arms (see page 22-327).
 Washer Fluid Level Switch Test
Canada models
1. Remove the right inner fender (see page 20-290).
2. Disconnect the 2P connector (A) from the washer fluid
level switch (B).
3. Remove the washer fluid level switch from the
w ...
 Washer Reservoir Replacement
1. Remove the right inner fender (see page 20-290).
2. Disconnect the 2P connector(s) (A) from the washer
motor (B) and the washer fluid level switch (Canada
models).
Washer Reservoir Capacity:
...
See also:
Backlash Inspection
1. Install both axles into the A/T differential, then place
the axles on V-blocks.
2. Check the backlash of the pinion gears (A) using a dial
indicator (B).
Standard: 0.05-0.15 mm (0.002-0.006 i ...
Training HomeLink
Before you begin - If you just
received your vehicle and have not
trained any of the buttons in
HomeLink before, you should erase
any previously learned codes before
training the first butto ...
Playing Discs (Models without navigation system)
Playing Discs (Models without navigation system) ...