 Honda Accord: Test/Replacement
EX-L, EX-L PZEV models
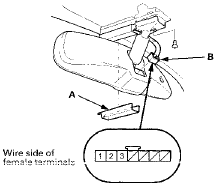
1. Remove the cover (A), then disconnect BP connector (B).

2. Turn the ignition switch to ON (II).
3. Measure the voltage between terminal No. 2 and body ground.
• If there is less than 0.2 V, go to step 4.
• If there is more than 0.2 V, check for: - An open or high resistance in the wire.
- Poor ground (G501).
4. Measure the voltage between terminal No. 1 and body ground.
• if there is battery voltage, go to step 5.
• If there is no voltage, check for: - Blown No. 5 (7.5 A) fuse in the driver's under-dash fuse/relay box.
- An open or high resistance in the wire.
5. Measure the voltage between terminal No. 3 and body ground with the transmission range switch in R position.
• If there is battery voltage, replace the mirror assembly.
• If there is no voltage, check for: - An open or high resistance in the wire.
- Faulty driver's under-dash fuse/relay box.
- Faulty transmission range switch.
 System Description
EX-L, EX-L PZEV models
The automatic dimming Inside mirror has a front-facing
lux level sensor (A), rear-facing lux level sensors (B), and
a control unit. The control unit receives signals from
ea ...
 Power Seats
...
See also:
Brake Booster Replacement
1. Remove the cowl cover (see page 20-278).
2. Remove the strut brace (if equipped) (see page
20-306).
3. Remove the master cylinder (see page 19-26).
4. Disconnect the brake booster vacuum ...
Starter System Circuit
Troubleshooting
Alternator, Regulator, Battery and Starter OTC3131 *
- Available through the Honda Tool and Equipment
Program 888-424-6857
NOTE:
- Air temperature must be within 59-”100 В°F (15-” ...
ENGINE START/STOP Button
• Changing the Power Mode
ENGINE START/STOP Button Operating Range
You can start the engine when the smart entry
remote is inside the vehicle.
The engine may also run if the smart entry r ...
