 Honda Accord: Steering Wheel Removal
SRS components are located in this area. Review the SRS component locations: 4-door {see page 24-21), 2-door (see page 24-23) and the precautions and procedures (see page 24-25) before doing repairs or service.
1. Do the battery terminal disconnection procedure (see page 22-91).
2. Set the front wheels in the straight ahead position, then remove the driver's airbag from the steering wheel (see page 24-211).
3. Disconnect the cable reel subharness connector (A).
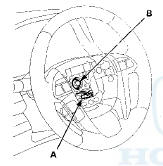
4. Loosen the steering wheel bolt (B) three turns.
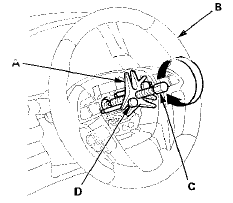
5. Install a commercially available steering wheel puller (A) on the steering wheel (B). Free the steering wheel from the steering column shaft by turning the pressure bolt (C) of the puller.
Note these items when removing the steering wheel: -Do not tap on the steering wheel or the steering column shaft when removing the steering wheel.
-If you thread the puller bolts (D) into the wheel hub more than five threads, the bolts will hit the cable reel and damage it. To prevent this, install a pair of jam nuts five threads up on each puller bolt.
6. Remove the steering wheel puller, then remove the steering wheel bolt and steering wheel from the steering column.

 Steering Wheel Disassembly/Reassembly
4-door
*: With Navigation
2-door
*: With Navigation ...
See also:
Grab Handle Removal/Installation
Special Tools Required
KTC Trim Tool Set SOJATP2014*
*Available through the Honda Tool and
Equipment
Program; call 888-424-6857
NOTE:
- Use the appropriate tool from the KTC trim tool set to
a ...
Auto Door Locking/Unlocking
Your vehicle locks and unlocks all doors automatically when a certain
condition is
met.
• Auto Door Locking
• Drive lock mode
All doors lock when the vehicle’s speed reaches about 10 mph ...
Front Impact Sensor Replacement
Removal
1. Do t h e battery t e r m i n a l d i s c o n n e c t i o n procedure (see
page 22-91), t h e n w a i t at least 3 m i n u t e s before
s t a r t i ng work.
2. Remove t h e f r o n t b ...