 Honda Accord: Shift Lever Installation
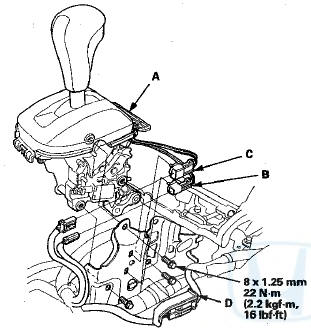
1. Install the shift lever assembly (A).
Type A Shift Lever
Type B Shift Lever
2. Connect the shift lock solenoid connector (B) and the park pin switch/A/T gear position indicator panel light connector (C), and install the harness cover (D) on the shift lever bracket base.
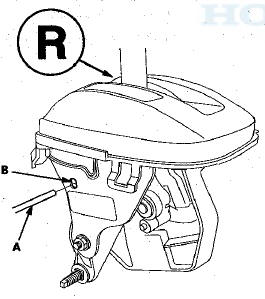
3. Push the shift cable (A) until it stops, then release it.
Pull the shift cable back one step so that the shift position is in R. Do not hold the shift cable guide (B) to adjust the shift cable.
4. Turn the ignition switch to ON (II), and check that the R position indicator comes on.
5. Turn the ignition switch to LOCK (0).
6. Plaee the shift lever in R, then insert a 6.0 mm (0.24 in) pin (A) into the positioning hole (B) on the shift lever, through the positioning hole on the shift lever, and into the positioning hole on the bracket. Use only a 6.0 mm (0.24 in) pin with no burrs.
Type A Shift Lever
Type B Shift Lever
7. Align the shift cable slot (A) between the socket holder (B) and the socket holder retainer (C) with the opening (D) in the shift cable bracket (E), then slide the holder into the bracket while installing the shift cable end (F) over the mounting stud (G) by aligning its square hole (H) with the square fitting (I) at the bottom of the stud.
Do not install the shift cable by holding the shift cable guide (J).
NOTE: When the socket holder is installed in the shift cable bracket, the retainer lock is unhinged and releases the holder retainer lock, then the holder retainer returns under spring force to secure the shift cable.

8. Push the retainer lock (A) fully to lock the socket holder retainer (B), and make sure that the retainer lock fits into the hinged-joint (C). If the retainer lock does not fit with the edge of the hinged-joint, rotate the holder retainer counterclockwise while pushing the retainer lock until it locks.
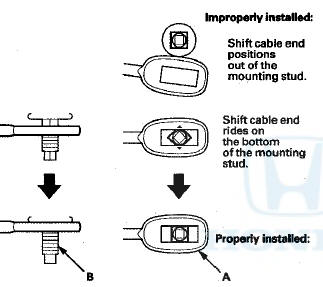
9. Make sure the shift cable end (A) is properly installed on the mounting stud (B).
-If the cable end is out of position on the mounting stud, remove the shift cable from the shift cable braket, and reinstall the shift cable. Do not install the shift cable end on the mounting stud while the shift cable is on the shift cable braket.
-If the cable end rides on the bottom of the mounting stud, rotate the stud and align the square fitting with the hole.
10. Install and tighten the nut (A) on the shift cable end.
11. Remove the 6.0 mm (0.24 in) pin (B) that was installed to hold the shift lever.
12. Turn the ignition switch to ON (II). Move the shift lever to each position, and check that the A/T gear position indicator follows the transmission range switch.
13. Shift the shift lever to P, and check that the shift lock works properly. Push the shift lock release, and check that the shift lever releases, and also check that the shift lever locks when it is shifted back to P.
14. Reinstall the center console (see page 20-158).
 Shift Lever Removal
1. Remove the center console (see page 20-158).
2. Move the shift lever to R.
3. Remove the nut securing the shift cable end.
4. Unlock the retainer (A).
5. Rotate the socket holder retain ...
 Shift Lever Disassembly/Reassembly
Type A Shift Lever
NOTE: Make sure not to get any silicone grease on the terminal part of the
connectors and switches, especially if you
have silicone grease on your hands of gloves.
Type B Shi ...
See also:
Drain Channel Slider and Cable
Assembly Replacement
NOTE: Put on gloves to protect your hands.
1. Remove these items: .
- Headliner (see page 20-140)
- Moonroof glass (see page 20-91)
2. Remove the frame (see page 20-97).
3. Remove these par ...
To Play a USB Flash Memory Device
This audio system can select and
play the audio files on a USB flash
memory device with the same
controls used for the disc player. To
play a USB flash memory device,
connect it to the USB a ...
Brake Pedal Replacement
1. Disconnect the brake pedal position switch
connector ( A ) .
2. Remove the lock pin (B) and the clevis pin (C).
3. Remove the brake pedal support member (D).
4. Remove the brake pedal bra ...