 Honda Accord: Roof Molding Replacement
Special Tools Required
KTC Trim Tool S e t SOJATP2014*
* Available through the Honda Tool and Equipment Program; call 888-424-6857
Molding Replacement
NOTE: - Put on gloves to protect your hands.
- Take care not to damage the windshield.
- Do not use any metallic tools to remove the windshield area of the roof molding, or you may chip or crack the windshield.
- Use the appropriate tool from the KTC trim tool set to avoid damage when removing components.
- Take care not to bend the roof molding.
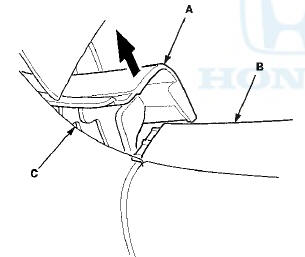
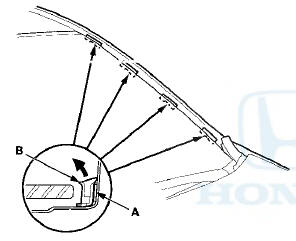
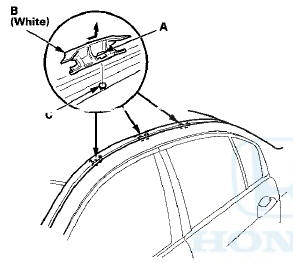
1. Release the hood hinge cover (A) from the bottom edge of the roof molding (B) and under the front fender (C).
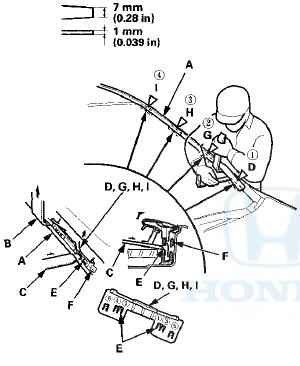
2. Remove the windshield area of the roof molding (A).
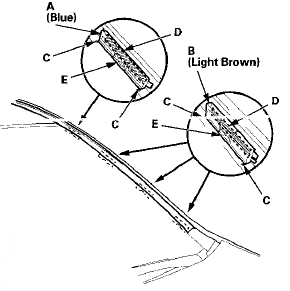
-1. Carefully insert the large trim tool (B) and the plastic spatula (C) (from the KTC tool set) under the molding next to the lower clip (D).
-2. While pulling up the clip area of the molding by hand, push each of the six small hooks (E) in the numbered sequence shown to release the clip from the retainer (F) on the A-pillar.
Do not try to pry up the clip if it is hard to release from the clip on the A-pillar.
-3. Gradually work your way up to release each of the .
upper clips (G, H, I).
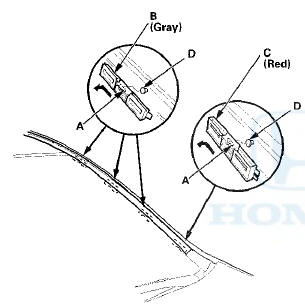
2-door
Fastener Locations

4-door
Fastener Locations
D : Clip (White)
G  : Clip (Orange)
H : Clip (Red)
I  : Clip (Blue)
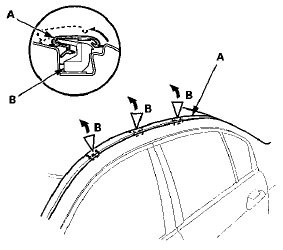
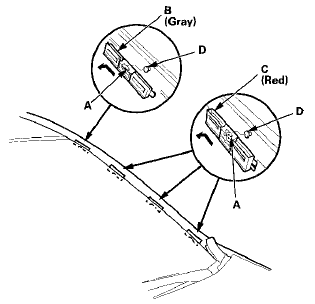
3. Pull up the roof area of the roof molding (A) to release it from the retainers (B).
Fastener Locations
B : Retainer, 3
(White)
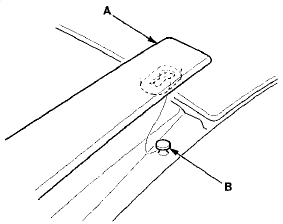
4. Pull up and release the rear end of the roof molding (A) from the pin (B) on the body, then remove the roof molding.
5. Install the molding in the reverse order of removal, and note these items: - Make sure the roof molding is installed securely.
- If the clips are damaged or stress-whitened, replace them with new ones.
Retainer Replacement {Windshield Area - Adhesive Type)
1. Gradually scrape off the adhesive tape (A) under the retainers (B) while heating it with a heat gun to about 212-248 В°F (100-120 В°C).
NOTE: - Do not overheat the painted surface around the retainers.
- To keep the exterior plastic parts near the A-pillar from being overheated by the heat gun, wrap them with aluminum foil.
2. Clean the body bonding surface with a shop towel dampened in isopropyl alcohol. After cleaning, keep oil, grease, and water from getting on the surface.
3. Install the upper retainers (A) and the lower retainer (B).
-1. Peel the adhesive backing away from the retainers.
-2. Line up the retainers with the alignment marks (C) on the body, and attach the retainers with adhesive tape (D).
-3. Apply two-part epoxy adhesive (E) around the edge of the retainers as shown.
Retainer Replacement (Windshield Area - Type)
NOTE; - Take care not to scratch the body or damage the windshield.
- When prying with a flat-tip screwdriver, wrap it with protective tape to prevent damage.
1. Pry out the middle hooks (A) with a flat-tip screwdriver, and slide the upper retainers (B) and the lower retainer (C) upward to release them from the pins (D) on the A-pillar.
2-door
4-door
2. Install the retainers in the reverse order of removal, and make sure the retainers are securely fastened on the A-pillar pins.
Retainer Replacement {Roof Area)
NOTE: - Take care not to scratch the body.
- When prying with a flat-tip screwdriver, wrap it with protective tape to prevent damage.
1. Pry up the middle hooks (A) with a flat-tip screwdriver, and slide the retainers (B) rearward to release them from the pins (C) on the body.
2. Install the retainers in the reverse order of removal, and make sure the retainers are securely fastened on the body pins.
 Cowl Cover Replacement
Special Tools Required
KTC Trim Tool Set SOJATP2014*
*Available through the Honda Tool and
Equipment
Program; call 888-424-6857
Cowl Cover Replacement
NOTE:
- Put on gloves to protect your han ...
 Side Sill Protection Tape Replacement
2-door
1. Slowly remove the old side sill protection tape.
2. Clean the body bonding surface with a shop towel
dampened in isopropyl alcohol. After cleaning, keep
oil, grease, and water from get ...
See also:
Childproof Door Locks
The childproof door locks prevent the rear doors from being opened from the
inside
regardless of the position of the lock tab.
• Setting the Childproof Door Locks
Slide the lever in the rear d ...
Pump Pressure Test w i th T/N 07406-0010001
Special Tools Required
-Pump Joint Adapter 07RAK-S040111 or P/S Joint
Adapter (pump) 07RAK-S040110
-Hose Joint Adapter 07RAK-S040122
-P/S Pressure Gauge 07406-0010001
Check the fluid pressure as ...
Ball Joint Boot Inspection / Replacemen
Special Tools Required
- Clip Guide, 45 mm 070AG-SJA0300
-Clip Guide, 41 mm 07974-SA50700
1. Check the ball joint boot for weakness, damage,
cracks, and grease leaks.
NOTE:
- If the ball joint ...