 Honda Accord: Passenger's Air Mix Control Motor
Test
Honda Accord: Passenger's Air Mix Control Motor
Test
NOTE: Before testing the motor, check for HVAC DTCs (see page 21-101).
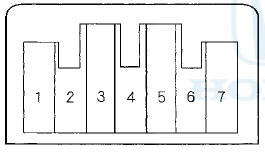
1. Disconnect the 7P connector from the passenger's air mix control motor.

Incorrectly applying power and ground to the passenger's air mix control motor will damage it.
Follow the instructions carefully.
2. Connect battery power to terminal No. 1 of the passenger's air mix control motor, and ground terminal No. 2; the passenger's air mix control motor should run, and stop at Max Cool. If it doesn't, reverse the connections; the passenger's air mix control motor should run, and stop at Max Hot. When the passenger's air mix control motor stops running, disconnect battery power immediately.
PASSENGER'S AIR MIX CONTROL MOTOR
3. If the passenger's air mix control motor did not run in step 2, remove it, then check the passenger's air mix control linkage and door for smooth movement.
• If the linkage and door move smoothly, replace the passenger's air mix control motor (see page 21-188).
• If the linkage or door sticks or binds, repair them as needed.
• If the passenger's air mix control motor runs smoothly, go to step 4.
4. Measure the resistance between terminals No. 5 and No. 7. It should be between 4.2 to 7.8 kQ.
5. Reconnect the passenger's air mix control motor 7P connector, then turn the ignition switch to ON (II).
6. Using the backprobe set, measure the voltage between terminals No. 3 and No. 5 of the 7P connector.
Max Cool: about 1.5 V
Max Hot: about 4.5 V
7. If either the resistance or the voltage readings are not as specified, replace the passenger's air mix control motor (see page 21 -188).
 Sunlight Sensor Replacement
1. Remove the sunlight sensor (A) from the dashboard,
then disconnect the connector (B). Be careful not to
damage the sensor and the dashboard.
2. Install the sensor in the reverse order of remov ...
 Passenger's Air Mix Control Motor
Replacement
Passenger's Air Mix Control Motor
Replacement
1. Remove the glove box (see page 20-174).
2, Disconnect the 4P connector (A) from the power
transistor (B), and the 7P connector (C) from the
passenger's air mix control motor (D). Remove the
s ...
See also:
Dashboard/Steering Hanger Beam
Removal/Installation
Special Tools Required
KTC Trim Tool Set SOJATP2014*
*Available through the Honda Tool and Equipment
Program; call 888-424-6857
SRS components are located in this area. Review the
SRS component l ...
PCV Valve Inspection
1. Check the PCV valve (A), hoses (B), and connections
for leaks or restrictions.
1.PCV valve when the hose between the PCV valve and
intake manifold is lightly pinched (A) with your fingers
or ...