 Honda Accord: Opening the Hood
1. Park the vehicle on a level surface, and set
the parking brake.
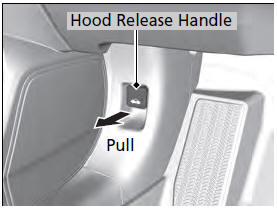
2. Pull the hood release handle under the
lower left corner of the dashboard.
- The hood will pop up slightly.
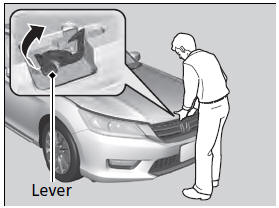
3. Push up the hood latch lever in the center of the hood to release the lock mechanism, and open the hood.
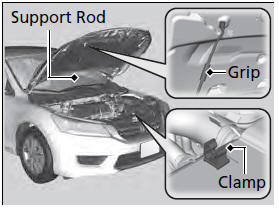

4. Remove the support rod from the clamp using the grip. Mount the support rod in the hood.
When closing, remove the support rod, and stow it in the clamp, then gently lower the hood. Remove your hand at a height of approximately 12 inches (30 cm) and let the hood close.


4. Lift the hood up most of the way.
- The hydraulic supports will lift it up the
rest of the way and hold it up.
When closing, lower it to approximately 12 inches (30 cm), then press down firmly with your hands.
NOTICE
Do not open the hood when the wiper arms are raised.
The hood will strike the wipers, and may damage either the hood or the wipers.
When closing the hood, check that the hood is securely latched.
If the hood latch lever moves stiffly, or if you can open the hood without lifting the lever, the latch mechanism should be cleaned and lubricated.

 Recommended Engine Oil
Oil is a major contributor to your engine's
performance and longevity. If you drive the
vehicle with insufficient or deteriorated oil,
the engine may fail or be damaged.
This seal indicates ...
See also:
Climate Control Switch
Communication Line Circuit
Troubleshooting
1. Operate the climate control system with the
passenger's climate control switch in all modes.
Does the climate control system operate?
YES-lntermittent failure. Check for loose wires or
poor c ...
Adjust the Head Restraints
Adjust the driver’s head restraint so
the center of the back of your head
rests against the center of the
restraint.
Have passengers adjust their head
restraints properly as well. Taller ...
Airbag System Components
Airbag System Components
Your airbag system includes:
Two SRS (supplemental restraint
system) front airbags. The driver’s
airbag is stored in the center of
the steering wheel; the front
...