 Honda Accord: Installing a Child Seat with LATCH
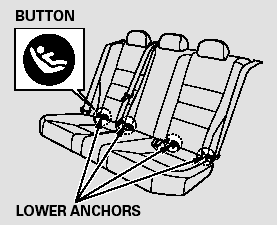
Your vehicle is equipped with LATCH (Lower Anchors and Tethers for CHildren) at the outer rear seats.
The lower anchors are located between the seat-back and seat bottom, and are to be used only with a child seat designed for use with LATCH.
The location of each lower anchor is indicated by a small button above the anchor point.
To install a LATCH-compatible child seat:
1. Move the seat belt buckle or tongue away from the lower anchors.
2. Make sure there are no objects near the anchors that could prevent a secure connection between the child seat and the anchors.
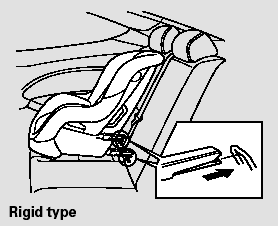
3. Place the child seat on the vehicle seat, then attach the seat to the lower anchors according to the child seat maker’s instructions.
Some LATCH-compatible seats have a rigid-type connector as shown above.
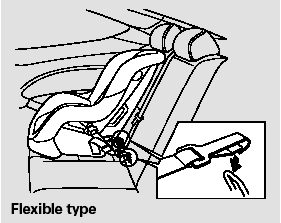
Other LATCH-compatible seats have a flexible-type connector as shown above.
4. Whatever type you have, follow the child seat maker’s instructions for adjusting or tightening the fit.
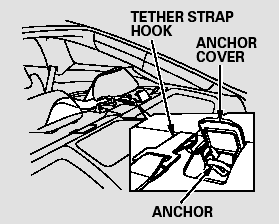
5. Lift the head restraint, then route the tether strap through the legs of the head restraint and over the seat-back, making sure the strap is not twisted.
6. Open the anchor cover.
7. Attach the tether strap hook to the tether anchor, then tighten the strap as instructed by the child seat maker.
8. Push and pull the child seat forward and from side-to-side to verify that it is secure.
 Installing a Child Seat
After selecting a proper child seat
and a good place to install the seat,
there are three main steps in
installing the seat:
1. Properly secure the child seat to
the vehicle. All child seats ...
 Installing a Child Seat with a Lap/Shoulder Belt
When not using the LATCH system,
all child seats must be secured to the
vehicle with the lap part of a lap/
shoulder belt.
In addition, the lap/shoulder belts in
all seating positions except ...
See also:
Trunk Lid Opener/Fuel Fill Door Opener
Replacement
Special Toots Required
KTC Trim Tool Set SOJATP2014*
*Available through the Honda Tool and
Equipment
Program; call 888-424-6857
NOTE:
- Put on gloves to protect your hands.
- Take care not t ...
Fuel Tank Unit Removal and
Installation
Special Tools Required
Fuel Sender Wrench 07AAA-S0XA100
Removal
1. Relieve the fuel pressure (see page 11-306).
2. Remove the fuel fill cap.
3. Remove the rear seat cushion (see page 20-241). ...
Component Location Index
4-door
2-door
...