 Honda Accord: Ignition Switch Test
NOTE: SRS components are located in the area. Review the SRS component locations 4-door (see page 24-21), 2-door (see page 24-23), and precautions and procedures (see page 24-25) before doing repairs or servicing.
1. Do the battery terminal disconnection procedure (see page 22-91).
2. Remove the steering column covers (see page 20-181).
3. Disconnect the 5P connector (A) from the ignition switch (B).
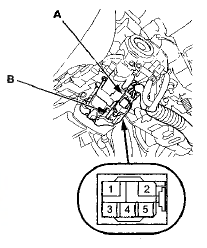
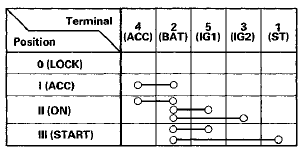
4. Check for continuity between the terminals in each switch position according to the table.
5. If the continuity is not as specified, replace the ignition switch (see page 22-107).
6. Do the battery terminal reconnection procedure (see page 22-91).
 Park Pin Switch Test
Produced in USA models
1. Remove the center console (see page 20-158).
2. Disconnect the A/T gear position indicator panel
light/park pin switch 6P connector (A) from the park
pin switch (B).
...
 Ignition Switch Replacement
NOTE: SRS components are located In the area. Review
the SRS component locations 4-door (see page 24-21),
2-door (see page 24-23), and precautions and
procedures (see page 24-25) before doing repai ...
See also:
Auto Door Locking
The auto door locking feature has
three possible settings:
The auto door locking is
deactivated all the time.
The doors lock whenever you
move the shift lever out of the
Park (P) position (A ...
Driver's Power Window Motor Test
Motor Test
1. Remove the power window master switch.
• 4-door (see page 22-305)
• 2-door (see page 22-306)
2. Test the motor in each direction by connecting battery
power and ground t ...
Visual Index
...