 Honda Accord: If the Smart Entry Remote Batteryis Weak
If the beeper sounds, the indicator on the ENGINE START/STOP button flashes, and the engine won’t start.

The To Start, Hold Remote Near Start Button message appears on the multiinformation display.

Start the engine as follows.
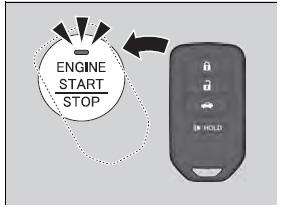
1. Touch the center of the ENGINE START/ STOP button with the H logo on the smart entry remote while the indicator on the ENGINE START/STOP button is flashing.
The buttons on the smart entry remote
should be facing you.
- The indicator flashes for about 30
seconds.
2. Depress the brake pedal (automatic
transmission) or clutch pedal (manual
transmission) and press the ENGINE
START/STOP button within 10 seconds
after the beeper sounds and the indicator
stays on.
- If you don’t depress the pedal, the mode
will change to ACCESSORY.

 Checking the Engine
If the engine does not start, check the starter.
If you must start the vehicle immediately, use an
assisting vehicle to jump start it.
...
 Emergency Engine Stop
If you cannot stop the engine by pressing the ENGINE START/STOP
button, do
either of the following operations:
• Press and hold the ENGINE START/STOP button for about two seconds.
• Firmly ...
See also:
Review of the 2023 Mercedes-Benz C300: Setting the Standard in Small Luxury Sedans?
In a market Mercedes-Benz maintains its commitment to its sedan lineup, extending from the prestigious S-Class to the more accessible C-Class. Despite its entry-level status within the range, the W2 ...
Remote Transmitter
LOCK - Press this button once to
lock both doors. Some exterior lights
will flash once. When you push
LOCK twice within 5 seconds, you
will hear a beep to verify that the
doors are locked ...
Trunk Lid Opener Cable/Fuel Fill Door
Opener Cable Replacement
SRS components are located in this area. Review the
SRS component locations, 2-door (see page 24-23),
4-door (see page 24-21) and the precautions and
procedures (see page 24-25) before doing repair ...