 Honda Accord: Hood Latch Replacement
NOTE: - Put on gloves to protect your hands.
- Take care not to scratch the body or the related parts.
1. Remove the front grille cover: - 2-door (see page 20-274) - 4-door (see page 20-274) 2.4-door: Remove the hood latch cover (A).
-1. Detach the clips by pulling back the cover.
-2. Release the hook (B) by lowering the cover.
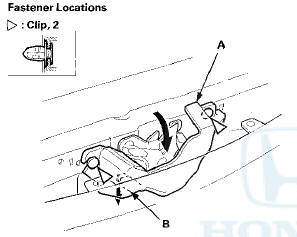
3. Remove the bolts, then remove the hood latch (A) from the body, and disconnect the hood opener cable (B) from the hood latch.
4. With hood latch switch: Disconnect the hood latch switch connector (C).
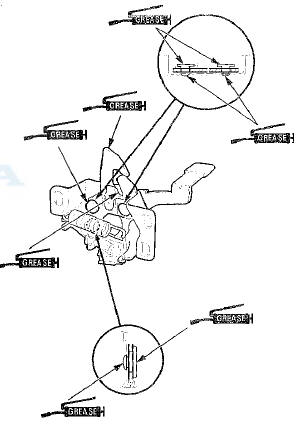
5. Install the latch in the reverse order of removal, and note these items: - Apply multipurpose grease to each location of the hood latch indicated by the arrows.
- Make sure the hood opener cable is connected properly and the hood latch switch connector is plugged in properly (for some models).
- Adjust the hood latch alignment (see step 4 on page 20-264).
- Make sure the hood opens properly and locks securely.
- 4-door: If the cover clips are damaged or stress-whitened, replace them with new ones.
- 4-door: Push the cover clips into place securely.
 Trunk Lid Opener Cable/Fuel Fill Door
Opener Cable Replacement
Trunk Lid Opener Cable/Fuel Fill Door
Opener Cable Replacement
SRS components are located in this area. Review the
SRS component locations, 2-door (see page 24-23),
4-door (see page 24-21) and the precautions and
procedures (see page 24-25) before doing repair ...
 Hood Release Handle Replacement
NOTE:
- Put on gloves to protect your hands.
- Take care not to scratch the body.
-Take care not to kink the hood opener
cable.
1. Remove the driver's kick panel:
- 2-door (see page 20-10 ...
See also:
Trim Remowal/Installatlon - Rear Side Area
Special Tools Required
KTC Trim Tool Set SOJATP2014*
*Available through the Honda Tool and
Equipment
Program; call 888-424-6857
2-door
SRS components are located in this area. Review the
SRS c ...
Folder Scan
This feature, when activated,
samples the first file in each folder
for 10 seconds. To scan a folder,
press the SCAN side of the SCAN/
A. SEL bar repeatedly. You will see
SCAN next to FOLDER ...
Symptom Troubleshooting Index
Power Door Locks/Kef less
1. Check for B-CAN DTCs. If any B-CAN DTCs are Indicated, refer to the B-CAN
System Diagnosis Test Mode A (see page
22-134) and resolve them first.
2. If the door lock ...