 Honda Accord: Fuel Filter Replacement
The fuel filter should be replaced whenever the fuel pressure drops below the specified value (see page 11-308), after making sure that the fuel pump and the fuel pressure regulator are OK.
1. Remove the fuel tank unit (see page 11-320).
2. Remove the fuel filter set (A).
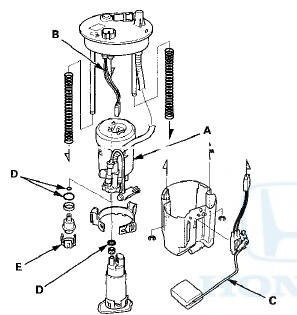
3. Check these items before installing the fuel tank unit - When connecting the wire harness (B), make sure the connection is secure and the connectors are firmly locked into place.
- When installing the fuel gauge sending unit (C), make sure the connection is secure and the connector is firmly locked into place. Be careful not to bend or twist it excessively.
4. Install the parts in the reverse order of removal with new O-rings (D) and a new bracket (E). When installing the fuel tank unit, align the marks on the unit and the fuel tank (see page 11-321).
NOTE: - Coat the O-rings with clean engine oil; do not use any other oil or fluid.
- Do not pinch the O-rings during installation.
- Use all the new parts supplied in the fuel filter replacement kit.
 Fuel Pressure Regulator Replacement
1. Remove the fuel tank unit (see page 11-320).
2. Remove the reservoir (A).
3. Remove the bracket (B).
4. Remove the fuel pressure regulator (C).
5. Install the parts in the reverse order ...
 Fuel Pump/Fuel Gauge Sending Unit
Replacement
Fuel Pump/Fuel Gauge Sending Unit
Replacement
1. Remove the fuel tank unit (see page 11 -320).
2. Remove the fuel level sensor (fuel gauge sending
unit) (A) from the fuel tank unit (B).
3. Check these items before installing the fuel tank ...
See also:
Ball Joint Removal
Special Tools Required
- Ball Joint Thread Protector, 14 mm 07AAE-SJAA100
- Ball Joint Thread Protector, 12 mm 07AAF-SDAA100
- Ball Joint Thread Protector, 10 mm 07AAF-SECA120
- Ball Joint Remover ...
Roof and Trunk
...
B-CAN System Diagnosis Test Mode
C
Do this diagnosis if a component that is controlled by the
B-CAN system does not stop or turn off.
NOTE:
• If the component does not turn on, go to B-CAN
System Diagnosis Test Mode D {see p ...