 Honda Accord: Front Seat Frame Replacement - Passenger's Seat
Special Tools Required
KTC Trim Tool Set SOJATP2014*
*Available through the Honda Tool and Equipment Program; call 888-424-6857
2-door
SRS components are located in this area. Review the SRS component locations (see page 24-23) and the precautions and procedures (see page 24-25) before doing repairs or service.
Do the front passenger's weight sensor initialization (see page 24-40), after front passenger's seat frame replacement.
NOTE; - Put on gloves to protect your hands.
- Use the appropriate tool from the KTC trim tool set to avoid damage when removing components.
- If the side airbag has deployed, replace the seat frame and related parts with new ones (see page 24-208).
1 Remove the front seat (see page 20-194).
2. Remove these items: - Front seat-back cover/pad (see page 20-213) - Front seat cushion cover/pad (see page 20-226) - Seat belt buckle (see page 24-7) - ODS unit (see page 24-237) - Side airbag (see page 24-215) 3. Slide the front seat frame rearward fully.
4. While releasing the tabs (A), disengage the hooks (B) from the rear outer seat weight sensor cover (C), then remove the front outer seat weight sensor cover (D).
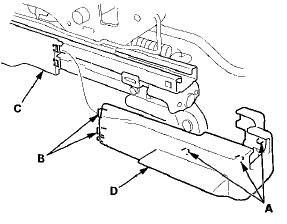
5. Release the tabs (A), then remove the front inner seat weight sensor cover (B).
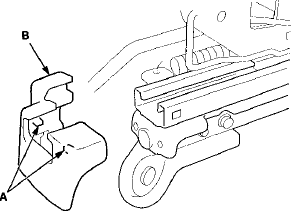
6. Slide the front seat frame forward fully, detach the clips, then remove the rear outer seat weight sensor cover (A) and the rear inner seat weight sensor cover (B) from the back of both seat tracks.
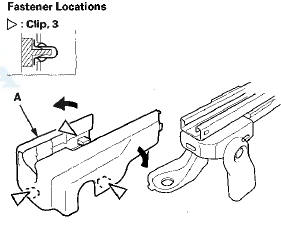
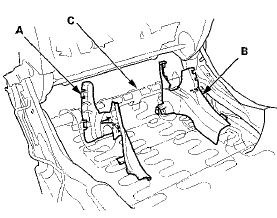
7. Remove the recline Inner cover (A) and the center Inner cover (B) from the seat frame (C).
8.Instail the seat trame in the reverse order of removal, and note these Items: - If the clips are damaged, replace them with new ones.
- Push the clips and the hooks into place securely.
Special Tools Required
KTC Trim Tool Set SOJATP2014*
*Available through the Honda Tool and Equipment Program; call 888-424-6857
4-door
SRS components are located in this area. Review the SRS component locations (see page 24-21) and the precautions and procedures (see page 24-25) before doing repairs or service.
Do the front passenger's weight sensor initialization (see page 24-40), after front passenger's seat frame replacement.
NOTE: - Put on gloves to protect your hands.
- Use the appropriate tool from the KTC trim tool set to avoid damage when removing components.
- If the side airbag has deployed, replace the seat frame and related parts with new ones (see page 24-208).
1. Remove the front seat (see page 20-194).
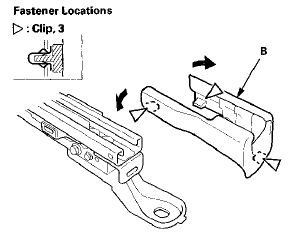
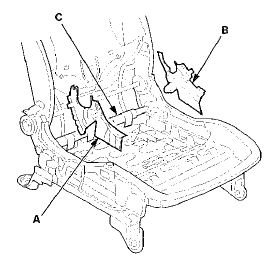
2. Remove these items: - Front seat-back cover/pad (see page 20-221) - Front seat cushion cover/pad (see page 20-234) - Seat belt buckle (see page 24-13) - ODS unit (see page 24-237) - Side airbag (see page 24-215) 3. Remove the recline inner cover (A) and the center inner cover (B) from the seat frame (C).
4. Install the seat frame in the reverse order of removal.
 Front Seat Frame Replacement
Driver's Seat
Front Seat Frame Replacement
Driver's Seat
Special Tools Required
KTC Trim Tool Set SOJATP2014*
*Available through the Honda Tool and
Equipment
Program; call 888-424-6857
SRS components are located in this area. Review the
SRS component ...
 Front Seat-back Cover Replacement
Special Tools Required
- KTC Trim Tool Set SOJATP2014*
-Trim Pad Remover, Snap-on A177A or
equivalent,
commercially available
*Available through the Honda Tool and
Equipment
Program; call 888 ...
See also:
USB Flash Memory Device Error Messages
If you see an error message on the
audio display while playing a USB
flash memory device, find the
solution in the chart to the right. If
you cannot clear the error message,
take your vehicl ...
General Troubleshooting Information
How to Use the Self-diagnostic Function
The HVAC control unit has a self-diagnostic function for the heating,
ventilation, and air conditioning system. To run the
self-diagnostic function, do the ...
How Your Front Airbags Work
If you ever have a moderate to
severe frontal collision, sensors will
detect the vehicle’s rapid
deceleration.
If the rate of deceleration is high
enough, the control unit will inflate
...