 Honda Accord: Front HFL-Navigation-ANC
Microphone
Removal/Installation
Honda Accord: Front HFL-Navigation-ANC
Microphone
Removal/Installation
NOTE: • Put on gloves to protect your hands.
• Take care not to scratch the dashboard and related parts.
• Lay a workshop towel under the parts when working on them to protect the face panel from scratches or other damage.
1. Remove the roof console (see page 20-140), and disconnect the connector (A) from the front HFL-navigation-ANC microphone (B).
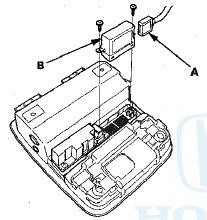
2. Remove the screws and the front HFL-navigation-ANC microphone.
3. Install the microphone in the reverse order of removal.
 Interface Dial
Removal/Installation
Interface Dial
Removal/Installation
1. Remove the audio unit (see page 23-114).
2. Remove the screw and harness cover (A).
3. Disconnect the interface dial connector (A). Remove
the screws and interface dial (B).
NOTE: If the ...
 GPS Antenna
Removal/Installation
GPS Antenna
Removal/Installation
1. Remove the rear shelf (see page 20-128).
2. Disconnect the GPS antenna connector (A), and
remove the bolt (B).
3. Detach the harness clips, and remove the GPS
antenna (C).
4. Install the ...
See also:
System Charging
• Air conditioning refrigerant or lubricant vapor can
irritate your eyes, nose, or throat.
• Be careful when connecting service equipment.
• Do not breathe refrigerant or vapor.
...
Horn Test/Replacement
1. Remove the grille cover;
•2-door (see page 20-274)
• 4-door (see page 20-274)
2. Disconnect the 1P connector (A) from each horn (B).
3. Test the horn by momentarily connecting L _.t ...
Resetting the Moonroof Control Unit
Resetting the moonroof is required when any of the following have occurred:
• The moonroof was moved manually while the battery was dead or disconnected.
• The moonroof motor was replace ...