 Honda Accord: Evaporator Core Replacement
1. Recover the refrigerant with a recovery/recycIing/charging station (see page 21-80).
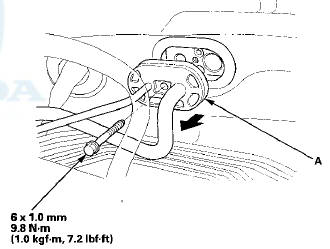
2. Remove the bolt from the A/C line clamp (A).
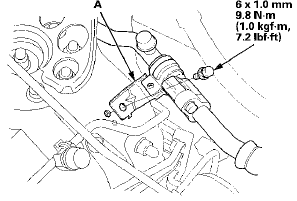
3. Remove the bolt, then disconnect the A/C line (A) from the evaporator core.
4. Remove the blower unit (see page 21-65).
5. Remove the passenger's console cover (see page 20-157).
6, Disconnect these connectors (A): The evaporator temperature sensor, the power transistor, and the passenger's air mix control motor (with climate control). Remove the connector clip (B) and the harness clip (C). Remove the self-tapping screws, the expansion valve cover (D), and the seal (E).
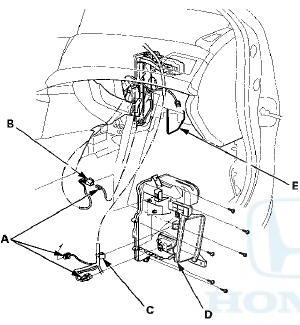
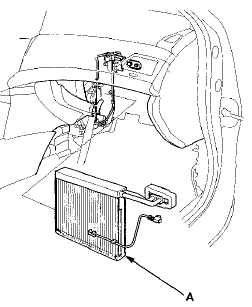
7. Carefully pull out the evaporator core (A) without bending the lines.
8. Remove the clips (A) and the evaporator temperature sensor (B). .
NOTE; At the factory, the evaporator temperature sensor is installed at the 13th' row of fins from the right side.
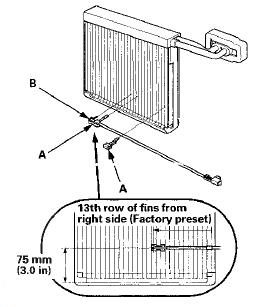
9. When the evaporator temperature sensor (A) is reinstalled onto a new evaporator core, set the evaporator temperature sensor in the 13th fin from the right side.
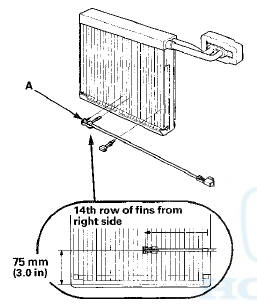
NOTE: If you are installing the sensor onto the old evaporator core, install the sensor onto the 14th fin, because the 13th fin may be deformed from the previous installation.
10. Install the core in the reverse order of removal, and note these items: • If you're installing a new evaporator core, add refrigerant oil (DENSO ND-OIL 8) (see page 21-6).
• Replace the O-rings with new ones at each fitting, and apply a thin coat of refrigerant oil before installing them. Be sure to use the correct O-rings for HFC-134a (R-134a) to avoid leakage.
• Immediately after using the oil, reinstall the cap on the container, and seal it to avoid moisture absorption.
• Do not spill the refrigerant oil on the vehicle; it may damage the paint; if the refrigerant oil contacts the paint, wash it off immediately.
• Make sure that there is no air leakage.
• Charge the system (see page 21-81).
 Blower Unit Component Replacement
Note these items when overhauling the blower unit:
• The recirculation control motor (A), the blower motor
(B), and the dust and pollen filter (C) can be replaced
without removing the blower u ...
 Expansion Valve Replacement
1. Remove the evaporator core (see page 21-67).
2. Remove the insulator (A) and bolts, then remove the
expansion valve (B) and O-rings (C).
3. Install the expansion valve in the reverse order o ...
See also:
Refilling Window Washer Fluid
Check the amount of window washer fluid by looking at the reservoir.
If the level is low, fill the washer reservoir.
If the washer fluid is low, the washer level
indicator comes on.
Pour the ...
Middle Floor Undercover
Replacement
Left Side
NOTE:
- Put on gloves to protect your hands.
- Take care not to scratch the body.
1. Remove the bolts and release the hook (A), then
remove the left middle floor undercover (B).
...