 Honda Accord: Expansion Valve Replacement
1. Remove the evaporator core (see page 21-67).
2. Remove the insulator (A) and bolts, then remove the expansion valve (B) and O-rings (C).
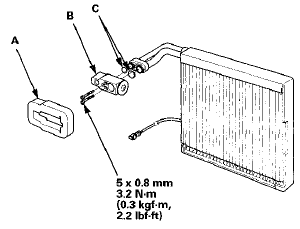
3. Install the expansion valve in the reverse order of removal, and note these items: • Replace the O-rings with new ones at each fitting, and apply a thin coat of refrigerant oil before installing them. Be sure to use the correct O-rings for HFC-134a (R-134a) to avoid leakage.
•immediately after using the oil, reinstall the cap on the container, and seal it to avoid moisture absorption.
• Do not spill the refrigerant oil on the vehicle; it may damage the paint; if the refrigerant oil contacts the paint, wash it off immediately.
• Make sure that there is no air leakage.
• Charge the system (see page 21-81).
 Evaporator Core Replacement
1. Recover the refrigerant with a
recovery/recycIing/charging station (see page 21-80).
2. Remove the bolt from the A/C line clamp (A).
3. Remove the bolt, then disconnect the A/C line (A)
fro ...
 Heater Unit/Core Replacement
SRS components are located in this area. Review the
SRS component locations (see page 24-21) and the
precautions and procedures (see page 24-25) before
doing repairs or service.
1. Do the batter ...
See also:
VSA Modulator-Control Unit Removal and
Installation
N O T E :
- Do not spill brake fluid on the vehicle; it may damage
the paint. If brake fluid gets on the paint, wash it off
immediately with water.
- Be careful not to damage or deform the brake ...
Childproof Door Locks
The childproof door locks prevent the rear doors from being opened from the
inside
regardless of the position of the lock tab.
• Setting the Childproof Door Locks
Slide the lever in the rear d ...
Console Compartment
To open the console compartment,
pull up on the lever and lift the
armrest.
To close, lower the armrest, and
push it down until it latches. ...