 Honda Accord: Engine Coolant
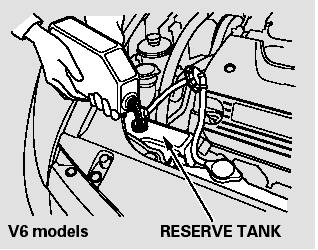
Adding Engine Coolant
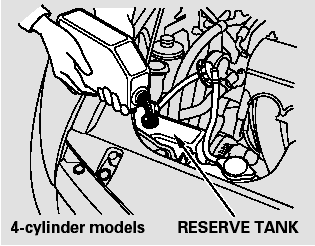
If the coolant level in the reserve tank is at or below the MIN line, add coolant to bring it up to the MAX line.
Inspect the cooling system for leaks.
Always use Honda Long-life Antifreeze/ Coolant Type 2. This coolant is pre-mixed with 50 percent antifreeze and 50 percent distilled water. Never add straight antifreeze or plain water.
If Honda antifreeze/coolant is not available, you may use another major-brand non-silicate coolant as a temporary replacement. Make sure it is a high-quality coolant recommended for aluminum engines.
Continued use of any non-Honda coolant can result in corrosion, causing the cooling system to malfunction or fail. Have the cooling system flushed and refilled with Honda antifreeze/coolant as soon as possible.
4-cylinder models only

If you regularly drive your vehicle under severe conditions in very low temperature (under - 31°F, - 35°C), a higher concentration of coolant should be used. Consult your Honda dealer f or more inf ormation on the proper coolant.
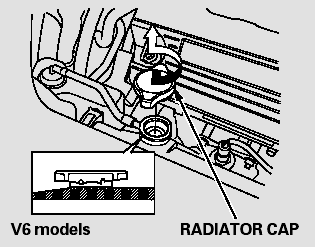
If the reserve tank is completely empty, you should also check the coolant level in the radiator.

Removing the radiator cap while the engine is hot can cause the coolant to spray out, seriously scalding you.
Always let the engine and radiator cool down before removing the radiator cap.
1. Make sure the engine and radiator are cool.
2. Relieve any pressure in the cooling system by turning the radiator cap counterclockwise, without pressing down.
3. Remove the radiator cap by pushing it down and turning it counterclockwise.
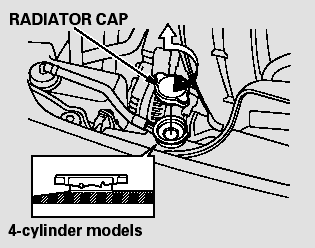
4. The coolant level should be up to the base of the filler neck. Add coolant if it is low.
Pour the coolant slowly and carefully so you do not spill any.
Clean up any spill immediately; it could damage components in the engine compartment.
5. Put the radiator cap back on, and tighten it fully.
6. Pour coolant into the reserve tank.
Fill it to halfway between the MAX andMIN marks. Put the cap back on the reserve tank.
Do not add any rust inhibitors or other additives to your vehicle’s cooling system. They may not be compatible with the coolant or engine components.
 Changing the Engine Oil and Filter
Always change the oil and filter
according to the maintenance
messages shown on the information
display. The oil and filter collect
contaminants that can damage your
engine if they are not r ...
 Windshield Washers
Check the level in the windshield
washer reservoir at least monthly
during normal use.
Check the fluid level by removing
the cap and looking at the level
gauge.
On Canadian models: The low ...
See also:
Under-floorTWC Removal/Installation
1. Raise the vehicle on a lift.
2. Remove the exhaust pipe hangers (A).
3. Remove the under-floor TWC (B).
4. Install the parts in the reverse order of removal with
new gaskets (C) and new s ...
Low Oil Pressure Indicator Circuit Troubleshooting (Short)
1. Connect the Honda Diagnostic System (HDS) to the
data link connector (DLC) (see step 2 on page 11-3).
2. Turn the ignition switch to ON (II).
3. Make sure the HDS communicates with the vehic ...
Park Lever Stop Inspection and
Adjustment
1. Set the park lever in the P position.
2. Measure the distance (A) between the park pawl shaft
(B) and the park lever roller pin (C).
Standard: 57.7-58.7 mm (2.27-2.31 in)
3. If the measurem ...