 Honda Accord: Drive Belt Auto-tensioner
Inspection
Honda Accord: Drive Belt Auto-tensioner
Inspection
Special Tools Required
Belt Tension Release Tool Snap-on YA9317 or equivalent, commercially available
1. Turn the ignition switch to ON (II), and make sure to turn the A/C switch OFF. Turn the ignition switch to LOCK (0).
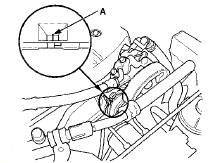
2. Check the position of the auto-tensioner indicator's pointer (A). Start the engine, then check the position again with the engine idling. If the position of the indicator moves or fluctuates very much, replace the auto-tensioner (see page 4-31).
3. Check for abnormal noise from the tensioner pulley. If you hear abnormal noise, replace the auto-tensioner pulley (see page 4-32).
4. Remove the drive belt (see page 4-30).
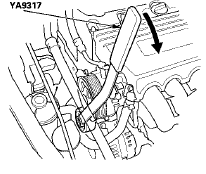
5. Move the auto-tensioner within its limit with the belt tension release tool in the direction of the rotation arrow. Check that the auto-tensioner moves smoothly and without any abnormal noise. If the auto-tensioner does not move smoothly, or if you hear abnormal noise, replace the auto-tensioner (see page 4-31).
6. Remove the auto-tensioner (see page 4-31).
7. Clamp the auto-tensioner (A) by using two 8 mm bolts (B) and a vise (C) as shown. Do not clamp the auto-tensioner itself.
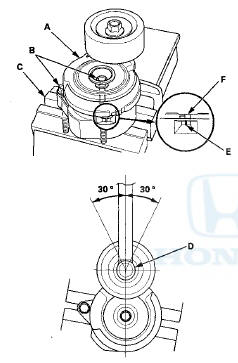
8. Attach the torque wrench (D) on the pulley bolt, and align it as shown.
9. Align the auto-tensioner indicator's pointer (E) on the auto-tensioner base with Max. belt position mark (F) on the auto-tensioner arm by using the torque wrench, and measure the torque. If the torque value is out of specification, replace the auto-tensioner (see page 4-31).
NOTE: If the auto-tensioner indicator's pointer exceeds the Max. belt position mark, recheck the torque.
Auto-tensioner Spring Torque: 33.1 - 4 0 . 5 N-m (3.38-4.13 kgf-m, 24.4-29.9 Ibfft)
 Drive Belt
Removal/Installation
Drive Belt
Removal/Installation
Special Tools Required
Belt Tension Release Tool Snap-on YA9317 or
equivalent, commercially available
1. Move the auto-tensioner (A) with the belt tension
release tool (B) in the direction of the ...
 Drive Belt Auto-tensioner
Removal/Installation
Drive Belt Auto-tensioner
Removal/Installation
1. Remove the drive belt (see page 4-30).
2. Remove the power steering (P/S) fluid reservoir from
the holder.
3. Remove the P/S pump (A) without disconnecting the
P/S hoses, then remove the P/ ...
See also:
Playing a CD
Your audio system supports audio CDs, CD-Rs and CD-RWs in either MP3, WMA, or
AAC*1 format. With the CD loaded, select the CD mode.
• How to Select a File from the Music Search List
(MP3/WMA/ ...
System Diagnostic Mode
Start-up procedure and Diagnostic IVieny
There are two ways t o enter the diagnostic mode:
Method 1 :
Start the vehicle. When the globe screen appears,
connect the SCS service connector (see page ...
Special Tools
...