 Honda Accord: Damper/Spring Removal and Installation
Removal
1. Raise and support the vehicle (see page 1-13).
2. Remove the front wheel.
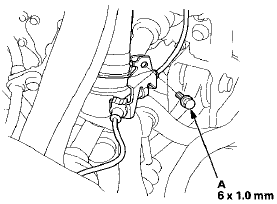
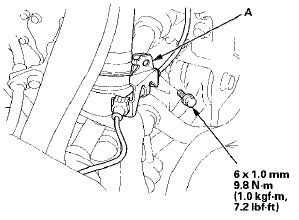
3. Remove the wheel speed sensor harness bracket mounting bolt (A).
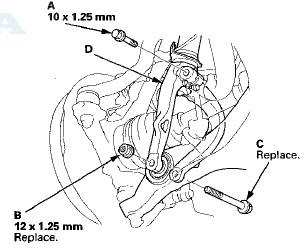
4. Remove the damper pinch bolt (A) and the damper fork mounting nut (B) while holding the mounting bolt (C), then remove the damper fork (D) from the damper and the lower arm.
5. Remove the front strut brace mounting nuts (A) (if equipped).
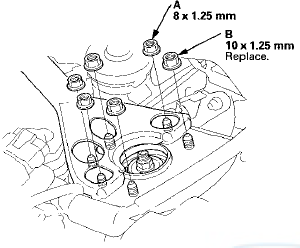
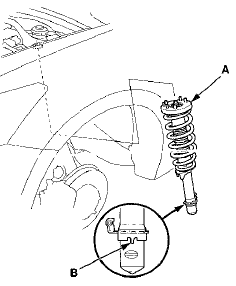
6. Remove the damper mounting nuts (B) from the top of the damper. Do not let the damper/spring drop down under its own weight.
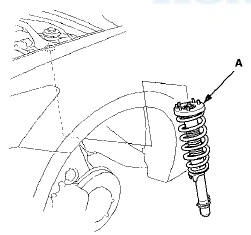
7. Remove the damper/spring (A).
NOTE: Be careful not to damage the body.
Installation
1. Position the damper/spring (A) in the body with the aligning tab (B) facing inside.
NOTE: Be careful not to damage the body.
2. Loosely install the new damper mounting nuts (A) to the top of the damper.
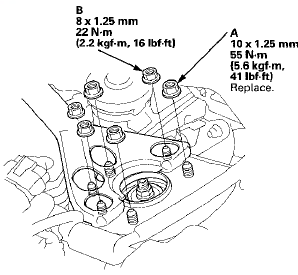
3. Loosely install the front strut brace mounting nuts (B) (if equipped).
4. Install the damper fork (A) over the driveshaft and onto the lower arm (B). Install the aligning tab (C) on the damper unit into the slot (D) of the damper fork.
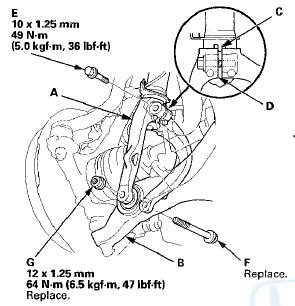
5. Loosely install the damper pinch bolt (E) into the damper fork.
6. Connect the damper fork and the lower arm with the new damper fork mounting bolt (F), then lightly tighten the new mounting nut (G).
7. Place a floor jack under the lower arm, and raise the suspension to load it with the vehicle's weight.
8. Tighten the damper pinch bolt and the damper fork mounting nut while holding the mounting bolt to the specified torque.
9. Tighten the damper mounting nuts and front strut brace mounting nuts (if equipped) on top of the damper to the specified torque values.
10. Install the wheel speed sensor harness bracket (A).
11. Clean the mating surfaces of the brake disc and the inside of the wheel, then install the front wheel.
12. Check the wheel alignment, and adjust it if necessary (see page 18-5).
 Stabilizer Bar Replacement
Special Tools Required
- Engine Hanger Adapter VSB02C000015*
- Engine Support Hanger, A and Reds AAR-T1256*
-Subframe Adapter VSB02C000016*
- Subframe Alignment Pin 070AG-SJAA10S
*: Available thr ...
 Damper/Spring Disassembly, Inspection, and
Reassembly
Damper/Spring Disassembly, Inspection, and
Reassembly
Exploded View
NOTE: When compressing the damper spring, use a
commercially available strut spring compressor (Branick
MST-580A or Model 7200, or equivalent) according to
the manufacturer's ins ...
See also:
ATF Feed Pipe Replacement
1. Remove the snap rings (A), the ATF feed pipes (B),
and the feed pipe flanges (C) from the end cover (D).
NOTE: Replace the end cover, if the 1st clutch ATF
feed pipe (E) replacement is require ...
Hazard Warning Switch
Test/Replacement
1. Remove these items:
• Center vent for w i t h navigation system (see page
20-178)
• Audio unit for without navigation system (see page
23-115)
2. Remove the hazard warning switch (A) ...
Driveshaft Removal
Special Tools Required
-Ball Joint Thread Protector, 14 mm 07AAE-SJAA100
-Ball Joint Remover, 28 mm 07MAC-SL0A202
1. Raise and support the vehicle, (see page 1-13)
2. Remove the front wheels.
3 ...