 Honda Accord: Crossover Network Control Unit
Removal/Installation
Honda Accord: Crossover Network Control Unit
Removal/Installation
Driver's Door Speaker Crossover Network Control Unit
1. Remove the driver's dashboard lower cover (see page 20-166).
2. Disconnect the connector (A), then remove the driver's door speaker crossover network control unit (B).
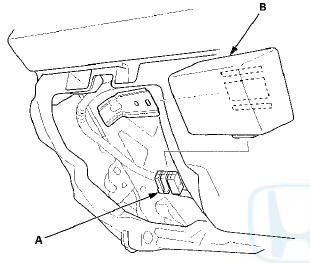
3. install the driver's door speaker crossover network control unit in the reverse order of removal.
Front Passenger's Door Speaker Crossover Network Control Unit
1. Remove the center console panel (see page 20-157), then remove the audio pocket (see page 20-168).
2. Disconnect the connector (A), then remove the passenger's door speaker crossover network control unit (B).
3. Install the passenger's door speaker crossover network control unit in the reverse order of removal.
 Active Noise Cancellation
Microphone
Removal/Installation
Active Noise Cancellation
Microphone
Removal/Installation
Front
1. Remove the roof console (see page 20-140), and
disconnect the connector (A) from the front active
noise cancellation microphone (B).
2. Remove the screws and the front active noise
can ...
 Speaker Test/Replacement
Front Door Speaker
1. Remove the door panel.
• 4-door (see page 20-17)
• 2-door (see page 20-12)
2. Remove t h e bolt (A). Then lift the speaker straight up
to release t h e lower cli ...
See also:
Ignition Key Light Test
1. Remove the steering column upper and lower covers
(see page 20-181).
2. Disconnect the 6P connector (A).
3. The LED should come on when power is connected to
terminal No. 6 and ground is co ...
Trunk Lower Trim Replacement
4-door
NOTE:
- Put on gloves to protect your hands.
- Take care not to scratch the trunk lid.
1. Remove the license plate from the trunk lid.
2. Remove the clips fastening the trunk lower t ...
Using HFL
• HFL Buttons
(Pick-up) button: Press
to go to the Phone Call screen or to answer an
incoming call.
(Hang-up/back) button:
Press to end a call or to cancel a command.
(Talk) button: Pr ...