 Honda Accord: Combination Light Switch
Test/Replacement
Honda Accord: Combination Light Switch
Test/Replacement
1. Remove the driver's dashboard lower cover (see page 20-166).
2. Remove the steering column covers (see page 17-10).
3. Disconnect the 12P connector (A) from the combination light switch (B).

4. Remove the two screws, then slide out the combination light switch.
5. Inspect the connector terminals to be sure they are all making good contact.
• If the terminals are bent, loose or corroded, repair them as necessary, and recheck the system.
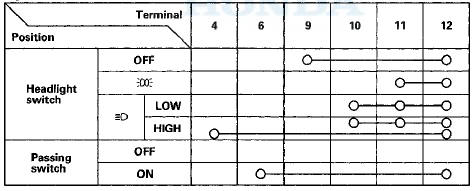
• If the terminals look OK, check for continuity between the terminals in each switch position according to the tables.
Light switch
Turn signal switch
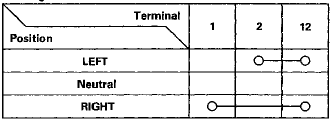
6. If the continuity is not as specified, replace the switch.
 MICU Input Test
NOTE:
• Before testing, troubleshoot the multiplex
integrated control unit first, using B-CAN System Diagnosis Test Mode A
{see page 22-134).
• Before testing, make sure the No. 15 (7 ...
 Headlight Adjustment
Headlights become very hot during use; do not touch
them or any attaching hardware immediately after
they have been turned off.
Before adjusting the headlights:
• Park the vehicle on a level ...
See also:
CKP Pulse Plate Replacement
1. Remove the crankshaft from the engine block (see
page 7-14).
2. Remove the CKP pulse plate (A) from the crankshaft.
3. Install the CKP pulse plate in the reverse order of
removal. ...
AM/FM Antenna Amplifier
Replacement
1. Remove the C-pillar trim.
• 4-door (see page 20-110)
• 2-door (see page 20-110)
2. Disconnect the connectors (A) from the AM/FM
antenna amplifier (B).
4-Door
2-Door
3. Remove ...
Mirror Holder Replacement
NOTE:
- Put on gloves to protect your hands.
- When prying with a flat-tip screwdriver, wrap it with
protective tape to prevent damage.
1. Carefully push on the top edge of the mirror holder ( ...