 Honda Accord: Clutch Pedal Assembly Replacement
1. Disconnect the clutch pedal position switch connector (A) and the clutch interlock switch connector (B).

2. Pry out the lock pin (C), and pull the clevis pin (D) out of the clevis.
3. Remove the master cylinder mounting nuts (E) and the clutch pedal mounting bolt (F).
4. Remove the clutch pedal assembly (G).
5. Remove the clutch pedal position switch (H) and the clutch interlock switch (I).
6. Loosely install the clutch pedal position switch (A) and the clutch interlock switch (B).
7. Install the clutch pedal assembly (A).
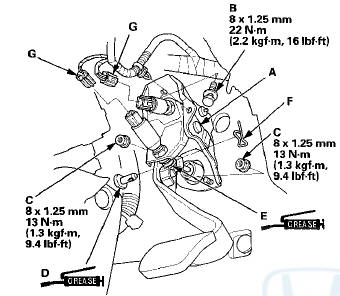
8. Install the clutch pedal mounting bolt (B) and the master cylinder mounting nuts (C).
9. Apply multipurpose grease to the clevis pin (D), and the mating surfaces (E) of the clevis and the pedal.
Slide the clevis pin into the clevis, then install the lock pin (F).
10. Adjust the clutch pedal, the clutch pedal position switch, and the clutch interlock switch (see page 12-7).
NOTE: Connect the switch connectors (G) after adjusting them.
11. Check the clutch operation.
 Clutch Pedal, Clutch Pedal Position Switch, and
Clutch Interlock Switch Adjustment
Clutch Pedal, Clutch Pedal Position Switch, and
Clutch Interlock Switch Adjustment
NOTE:
- For a cruise control problem, check the clutch pedal
position switch (see page 4-45).
- For a clutch interlock operation problem, check the
clutch interlock switch (see page 4-9).
- R ...
 Clutch Master Cylinder Replacement
NOTE:
- Use fender covers to avoid damaging
painted
surfaces.
- Do not spill brake fluid on the vehicle; it may damage
the paint or plastic. If brake fluid does contact the paint
or plastic, ...
See also:
Side Turn Signal/Emergency Indicator Light Bulbs*
Door mirrors have the side turn lights. Have an authorized Honda dealer
inspect and
replace the light bulbs.
...
Clutch Hose Replacement
NOTE:
- Replace the clutch hose if it is twisted, cracked, or
leaks.
- Use fender covers to avoid damaging painted
surfaces.
- Do not spill brake fluid on the vehicle; it may damage
the pain ...
Fuse Locations
If any electrical devices are not working,
turn the ignition switch to LOCK
and
check to see if any applicable fuse is blown.
• Engine Compartment Fuse Box
Located near the brake fluid rese ...