 Honda Accord: Climate Control Unit
Removal / Installation
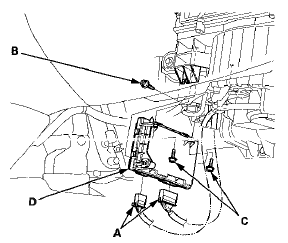
With Navigation
1. Remove the passenger's dashboard undercover (see page 20-170).
2. Disconnect the connectors (A). Loosen the bolt (B) and remove the bolts (C) from the climate control unit (D).

3. Install the control unit in the reverse order of removal.
After installation, operate the various functions to make sure they work properly.
4. Run the self-diagnostic function to confirm that there are no problems in the system (see page 21-102).
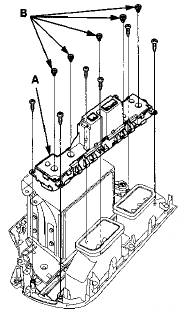
Without Navigation
1. Remove the audio unit (see page 23-115).
2. Remove the self-tapping screws and the climate control unit (A). If necessary, replace the bulbs (B).

3. Install the control unit in the reverse order of removal.
4. Run the self-diagnostic function to confirm that there are no problems in the system (see page 21-102).
 Recirculation Control Motor Test
NOTE: Before testing the motor, check for HVAC DTCs
(see page 21-101).
1. Disconnect the 7P connector from the recirculation
control motor.
Incorrectly applying power and ground to the
recirc ...
 Climate Control Switch
Removal / Installation
With Navigation
1 Remove the audio unit (see page 23-114).
2. Remove the self-tapping screws and the climate
control switches (A). If necessary, replace the bulbs
(B).
3. Install the switches ...
See also:
Headlight Bulbs
When replacing, use the following bulbs.
• High Beam Headlight
1. Unlock the holding clips, then remove the
upper part of the air intake duct and the air
intake tube.
2. Push the ta ...
How Your Front Airbags Work
If you ever have a moderate to
severe frontal collision, sensors will
detect the vehicle’s rapid
deceleration.
If the rate of deceleration is high
enough, the control unit will inflate
...
Output Shaft (Countershaft) Speed
Sensor Replacement
NOTE: For A/T models (see page 14-188).
M/T
1. Disconnect the output shaft (countershaft) speed
sensor 3P connector (A).
2. Remove the output shaft (countershaft) speed sensor
(B).
3. Instal ...
