 Honda Accord: Change Lever Assembly Disassembly/Reassembly
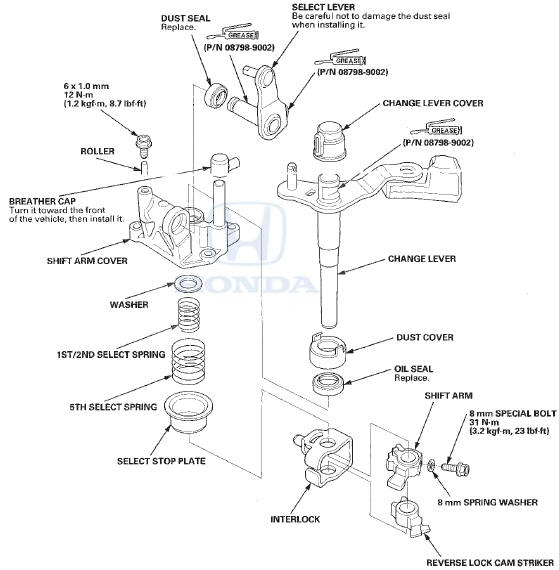
NOTE: Prior to reassembling, clean all the parts in solvent, dry them, and apply grease to contact surfaces as shown. Do not wash the rubber parts with solvent.
 Change Lever Clearance Inspection
1. Measure the clearance between the change lever (A)
and the select lever (B) with a feeler gauge (C). If the
clearance exceeds the service limit, go to step 2.
Standard: 0.05-”0.25 mm (0.002 ...
 Shift Fork Clearance Inspection
1. Measure the clearance between each shift fork (A)
and its matching synchro sleeve (B). If the clearance
exceeds the service limit, go to step 2.
Standard: 0.35-0.65 mm (0.014-0.026 inj
Service ...
See also:
Wipers and Washers
The windshield wipers and washers can be
used when the ignition switch is in ON
.
• MIST
The wipers run at high speed until you release
the lever.
• Wiper switch (OFF, INT, LO, HI)
Chan ...
Ball Joint Boot Inspection / Replacemen
Special Tools Required
- Clip Guide, 45 mm 070AG-SJA0300
-Clip Guide, 41 mm 07974-SA50700
1. Check the ball joint boot for weakness, damage,
cracks, and grease leaks.
NOTE:
- If the ball joint ...
Hood Release Handle Replacement
NOTE:
- Put on gloves to protect your hands.
- Take care not to scratch the body.
-Take care not to kink the hood opener
cable.
1. Remove the driver's kick panel:
- 2-door (see page 20-10 ...