 Honda Accord: Carrier Bearing Replacement
Special Tools Required
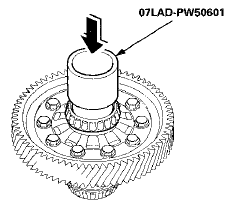
Attachment, 40 x 50 mm 07LAD-PW50601
NOTE: -The bearing and the bearing outer race should be replaced as a set.
-Inspect and adjust the carrier bearing preload whenever bearing is replaced.
•Check the bearing for wear and rough rotation. If the bearing is OK, removal is not necessary.
1. Remove the carrier bearing (A) using a commercially available puller (B), a bearing separator (C), and a spacer (D).
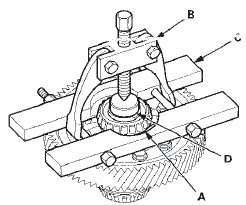
2. Install new carrier bearings using the 40 x 50 mm attachment with the small end and a press. Press the carrier bearing on securely so there is no clearance between the carrier bearing and the differential carrier.
 Backlash Inspection
1. Install both axles into the A/T differential, then place
the axles on V-blocks.
2. Check the backlash of the pinion gears (A) using a dial
indicator (B).
Standard: 0.05-0.15 mm (0.002-0.006 i ...
 Differential Carrier and Final Driven
Gear Replacement
Differential Carrier and Final Driven
Gear Replacement
1. Remove the final driven gear (A) from the differential
carrier (B).
NOTE: Differential carrier bolts have left-hand
threads.
2. Install the final driven gear in the direction shown on
the ...
See also:
Recirculation Control Motor Circuit
Troubleshooting
908-09 models 4-door with A/T and '10 model
with AT
1. Check the No. 16 (7.5 A) fuse in the driver's
under-dash fuse/ relay box.
Is the fuse OK?
YES-Go to step 2.
NO-Replace the fuse, and re ...
Using HFL
• HFL Buttons
(Pick-up) button: Press
to go to the Phone Call screen or to answer an
incoming call.
(Hang-up/back) button:
Press to end a call or to cancel a command.
(Talk) button: Pr ...