 Honda Accord: Cam Chain Removal
NOTE: Keep the cam chain away from magnetic fields.
1. Remove the front wheels.
2. Remove the splash shield (see step 25 on page 5-5).
3. Remove the drive belt (see page 4-30).
4. Remove the cylinder head cover (see page 6-73).
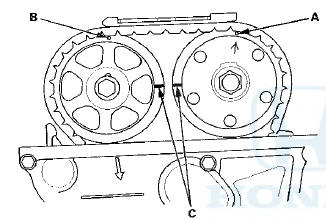
5. Set the No. 1 piston at top dead center (TDC). The punch mark (A) on the variable valve timing control (VTC) actuator and the punch mark (B) on the exhaust camshaft sprocket should be at the top. Align the TDC marks (C) on the VTC actuator and the exhaust camshaft sprocket.
6. Disconnect the VTC oil control solenoid valve connector (A) and remove the harness clamp (B).
7. Remove the VTC oil control solenoid valve (see page 11-273).
8. Remove the crankshaft pulley (see page 6-61).
9. Support the engine with a jack and a wood block under the oil pan.
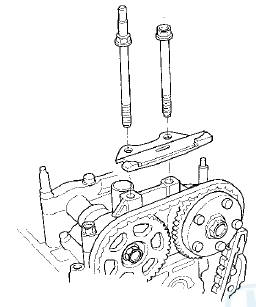
10. Remove the ground cable (A), then remove the side engine mount bracket (B).
11. Remove the side engine mount bracket mounting bolts.
12. Remove the cam chain case (A) and spacer (B).

13. Loosely install the crankshaft pulley.
14. Turn the crankshaft counterclockwise to compress the auto-tensioner.
15. Align the holes on the lock (A) and the auto-tensioner (B), then insert a 1.2 mm (0.05 in) diameter pin or lock pin (P/N 14511-PNA-003) (C) into the holes. Turn the crankshaft clockwise to secure the pin.
16. Remove the auto-tensioner.
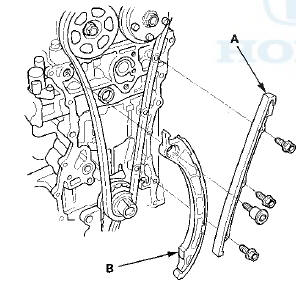
17. Remove cam chain guide B.
18. Remove cam chain guide A and the tensioner arm (B).
19. Remove the cam chain.
 Crankshaft Pulley Removal and Installation
Special Tools Required
Handle, 6-25-660L 07JAB-001020B
Crankshaft Pulley Holder 07AAB-RJAA100
Socket, 19 mm 07JAA-001020A or equivalent
Removal
1 . Remove the front wheels.
2. Remove the splas ...
 Cam Chain Installation
Special Tools Required
Camshaft Lock Pin Set 07AAB-RWCA120
NOTE:
- Keep the cam chain away from magnetic fields.
- Before doing this procedure, check that the variable
valve timing control (VTC ...
See also:
Paint Code
...
DTC Troubleshooting Index
NOTE: The above DTCs are indicated when the PGM-FI system is selected with
the HDS. Some automatic transmission DTCs cause the MIL to
come on. If the MIL is on and no DTCs are indicated in the PG ...
Checking Tires
To safely operate your vehicle, your tires must be of the proper type and
size, in
good condition with adequate tread, and properly inflated.
• Inflation guidelines
Properly inflated tires pro ...