 Honda Accord: Brake Hose Replacement
NOTE; - Before reassembling, cheek that all parts are free of dirt and other foreign particles.
- Replace parts with new ones whenever specified to do so.
- Do not spill brake fluid on the vehicle; it may damage the paint. If brake fluid gets on the paint, wash it off immediately with water.
- After removal, plug the ends of the hoses and the joints to prevent spilling brake fluid.
Front
1. Raise and support the vehicle (see page 1-13).
2. Remove the front wheel.
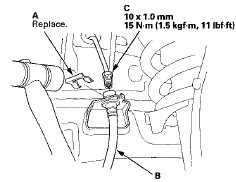
3. Disconnect the brake line (A) from the brake hose (B), then remove the brake hose clip (C).
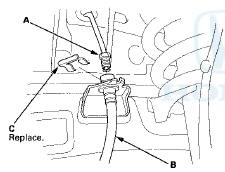
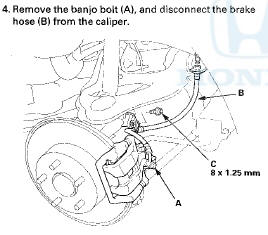
4. Remove the banjo bolt (A), and disconnect the brake hose (B) from the caliper.
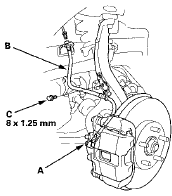
5. Remove the brake hose mounting bolt (C), then remove the brake hose.
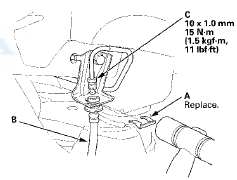
6. Install the brake hose (A) with the mounting bolt (B).

7. Connect the brake hose to the caliper with the banjo bolt (C) and new sealing washers (D).
8. Install the new brake hose clip (A) to the brake hose (B) on the bracket, then connect the brake line (C). Do not twist the brake hose.
9. After installing the brake hose, bleed the brake system (see page 19-9).
10. Do the following checks: - Check the brake hose and line joint for leaks, and tighten if necessary.
- Check the brake hoses for interference and twisting.
11. Clean the mating surfaces between the brake disc and the inside of the wheel, then install the front wheel.
Rear
1. Raise and s u p p o r t the v e h i c l e (see page 1-13).
2. R e m o v e t h e r e a r w h e e l .
3. D i s c o n n e c t t h e b r a k e l i n e (A) f r o m the b r a k e h o s e (B), t h e n r e m o v e t h e b r a k e h o s e c l i p (C).
5. Remove the brake hose mounting bolt (C), then remove the brake hose.
6. Install the brake hose (A) with the mounting bolt (B).

7. Connect the brake hose to the caliper with the banjo bolt (C) and new sealing washers (D).
8. Install the new brake hose clip (A) to the brake hose (B) on the bracket, then connect the brake line (C). Do not twist the brake hose.
9. After installing the brake hoses, bleed the brake system (see page 19-9).
10. Do the following checks: - Check the brake hose and line joint for leaks, and tighten if necessary.
- Check the brake hose for interference and twisting.
11. Clean the mating surfaces between the brake disc and the inside of the wheel, then install the rear wheel.
 Brake Hose and Line Inspection
1. Inspect t h e brake hoses for d a m a g e , deterioration, leaks,
interference, and twisting.
2. Check the brake lines for damage, rusting, and leaks. Also check for bent
brake lines.
3. ...
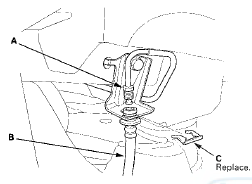
 Parking Brake Cable Replacement
Exploded View
NOTE:
- The parking brake cables must not be bent or
distorted. This will lead to stiff operation and
premature cable failure.
- Refer to the Exploded View as needed during this ...
See also:
Rear License Plate Light Bulbs
The license plate has two lights
above it. The bulbs should be
replaced by your dealer. ...
Shift Lock Solenoid Test
1. Connect the HDS to the DLC (A) located under the
driver's side of the dashboard.
2. Turn the ignition switch to ON (II). Make sure the HDS
communicates with the PCM. If it does not, go to the
...
Cam Chain Installation
Special Tools Required
Camshaft Lock Pin Set 07AAB-RWCA120
NOTE:
- Keep the cam chain away from magnetic fields.
- Before doing this procedure, check that the variable
valve timing control (VTC ...