 Honda Accord: Adjust the Head Restraints
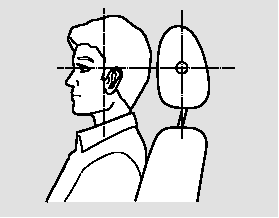
Adjust the driver’s head restraint so the center of the back of your head rests against the center of the restraint.
Have passengers adjust their head restraints properly as well. Taller persons should adjust their restraint as high as possible.

Improperly positioning head restraints reduces their effectiveness and you can be seriously injured in a crash.
Make sure head restraints are in place and positioned properly before driving.
Properly adjusted head restraints will help protect occupants from whiplash and other crash injuries.
See page for how to adjust the head restraints and how the driver’s and front passenger’s active head restraints work.
 Adjust the Seat-Backs
Adjust the driver’s seat-back to a
comfortable, upright position,
leaving ample space between your
chest and the airbag cover in the
center of the steering wheel.
Passengers with adjustab ...
 Fasten and Position the Seat Belts
Insert the latch plate into the buckle,
then tug on the belt to make sure the
belt is securely latched. Check that
the belt is not twisted, because a
twisted belt can cause serious
injuries ...
See also:
Recirculation Control Motor Test
'08-09 models 4-door with A/T and "10 model
with A/T
NOTE: Before testing the motor, check for HVAC DTCs
(see page 21-9).
1. Disconnect the 7P connector from the recirculation
control moto ...
Clutch
...
Symptom Troubleshooting
VSA activation indicator does not go off, and
no DTCs are stored
NOTE: If the VSA modulator was replaced prior to the
activation indicator turning on, do the VSA sensor
neutral position memorizati ...