 Honda Accord: A/C System Inspection
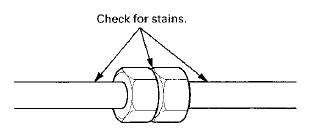
Before troubleshooting any problem with the air conditioning system, do the following: 1. With the ignition switch in LOCK (0), inspect the A/C components, the pressure lines and the hoses for stains that may indicate a refrigerant or a compressor oil leak.
2. Check the A/C condenser for material clogging the fins or for damage to the fins: • Carefully clean any material from the A/C condenser fins with water and detergent. If deeper cleaning is required, clean the fins with Hondabrite Motorcycle Cleaner (P/N 08732-0032).
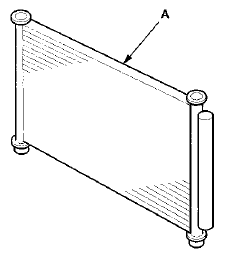
• Be sure to dry the A/C condenser (A) completely.
• - Refer to the refrigerant leak test (see page 21-82) to confirm leaks if there is visible damage to the A/C condenser.
3. Inspect the drive belt (see page 4-29).
4. Make sure no material is blocking the airflow to the A/C condenser.
5. Check the dust and pollen filter, and replace it if it is clogged (see page 21-79).
6. Check for kinks or sharp bends in the A/C lines and hoses, which can greatly reduce system performance.
Replace the A/C lines and hoses if they are kinked or damaged (see page 21-7).
7. Start the engine, turn the air conditioning system on, and allow it to run for a few minutes and reach stable operation.
8. Check that the A/C operates at each position of the blower fan switch (except OFF). If the A/C does not operate, refer to the symptom troubleshooting.
9. Check that the A/C compressor clutch (A) is engaged.
The pressure plate should be rotating at the same c n a o r i Р’В»c t h e pii Hey. !f the prcecurР’В© plate does not engage, refer to the symptom troubleshooting.
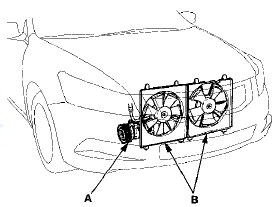
10. Check that the cooling fans (B) operate when the A/C compressor clutch is engaged. If either fan fails to . operate when the A/C compressor clutch is engaged, refer to the symptom troubleshooting.
11. Check that the engine idle speed is correct when the A/C is switched on and off, and when the A/C compressor clutch is engaged and disengaged.
 A/C Line Replacement
1.Discharge hose to the A /C compressor (6 x 1.0 mm): S.8 N-m (1.0 kgf-m, 7.2
Ibf-ft)
2.Discharge hose to the A /C condenser (6x1.Р’В© mm): 9.8 N-m f 1.0 kgf-m, 7.2
Ibf-ft)
3.Receiver lin ...
 General Troubleshooting Information
How to Use the Self-diagnostic Function
The HVAC control unit has a self-diagnostic function for the heating,
ventilation, and air conditioning system. To run the
self-diagnostic function, do the ...
See also:
Receiving XM Radio Service
If your XM Radio service has expired
or you purchased your vehicle from
a previous owner, you can listen to a
sampling of the broadcasts available
on XM Radio. With the ignition
switch in th ...
A/C Compressor Relief Valve
Replacement
1. Recover the refrigerant with a
recovery/recycling/charging station (see page 21-80).
2. Raise the vehicle on a lift.
3. Remove the relief valve (A) and the O-ring (B). Plug
the opening to k ...
Countershaft Disassembly
NOTE: Refer to the Exploded View in the Countershaft
Reassembly, as needed, when removing components
pressed onto the countershaft (see page 13-46).
1. Securely clamp the countershaft assembly In ...