 Honda Accord: XM Receiver Removal/Installation
1. Open the trunk lid, and remove the right trunk side trim panel {see page 20-132).
2. Disconnect the connectors (A) from the XM receiver (B).
4-Door
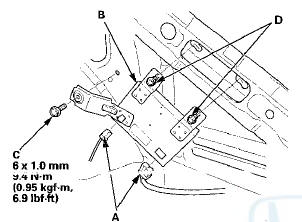
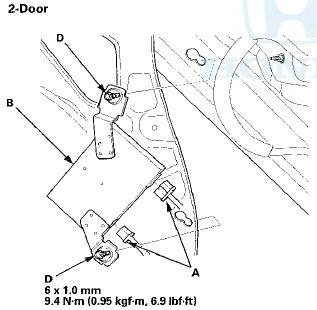
3. Remove the mounting bolt (C) and loosen the mounting bolts (D), then remove the XM receiver.
4. Install the XM receiver in the reverse order of removal.
 Stereo Amplifier
Removal/Installation
Stereo Amplifier
Removal/Installation
With Premium Audio System
1. Remove the glove box (see page 20-174).
2. Disconnect the connectors (A).
3. Remove the bolt (B) and loosen the bolts (C) securing
the stereo amplifier (D).
4. ...
 Active Noise Cancellation
Microphone
Removal/Installation
Active Noise Cancellation
Microphone
Removal/Installation
Front
1. Remove the roof console (see page 20-140), and
disconnect the connector (A) from the front active
noise cancellation microphone (B).
2. Remove the screws and the front active noise
can ...
See also:
A/C Signal Circuit Troubleshooting
1. Start the engine, and let it idle.
2. Turn the blower switch on.
3. Turn the A/C switch on.
4. Check the A/C CLUTCH in the DATA LIST with the
HDS.
Does it indicate ON?
YES-Go to step ...
Introduction
One of the best ways to enhance the enjoyment of your new vehicle is to
read this manual. In it, you will learn how to operate its driving controls and
convenience items. Afterwards, keep this own ...
Parking Light Bulbs
When replacing, use the following bulbs.
Turn the steering wheel and pull the inner fender back in the same way as
when
replacing the front turn signal/side marker light bulbs.
1. Turn the s ...