 Honda Accord: Transmission Fluid Pressure Switch B
(3rd Clutch) Replacement
Honda Accord: Transmission Fluid Pressure Switch B
(3rd Clutch) Replacement
1. Raise the vehicle on a lift, or apply the parking brake, block both rear wheels, and raise the front of the vehicle. Make sure it is securely supported.
2. Remove the splash shield.
3. Disconnect the connector (A) from the transmission fluid pressure switch B {3rd clutch) (B), then remove the transmission fluid pressure switch B (3rd clutch).
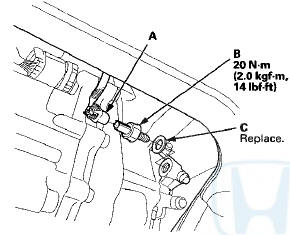
4. Install a new transmission fluid pressure switch B (3rd clutch) with a new sealing washer (C), and tighten the transmission fluid pressure switch B (3rd clutch) to the specified torque by turning the metal part, not the plastic part.
5. Check the connector for rust, dirt, or oil, and clean or repair if necessary, then connect the connector securely.
6. Install the splasTi shield.
 Transmission Fluid Pressure Switch A
(2nd Clutch) Replacement
Transmission Fluid Pressure Switch A
(2nd Clutch) Replacement
1. Remove the intake air duct.
2. Disconnect the connector (A) from the transmission
fluid pressure switch A (2nd clutch) (B), and remove
the transmission fluid pressure switch A (2nd clutch).
...
 ATF Temperature Sensor
Test/Replacement
ATF Temperature Sensor
Test/Replacement
1. Raise the vehicle on a lift, or apply the parking brake,
block both rear wheels, and raise the front of the
vehicle. Make sure it is securely supported.
2. Remove the splash shield.
3. Disc ...
See also:
Recommended Tire Pressures
Normal Driving
The following charts show the
recommended cold tire pressures for
most normal driving conditions.
4-cylinder models
V6 models
The compact spare tire pressure is:
60 psi (42 ...
Passenger's Under-dash Fuse/Relay
Box (MICU) Removal and
Installation
NOTE: SRS components are located in this area. Review
the SRS component locations 4-door (see page 24-21),
2-door (see page 24-23), and precautions, and
procedures (see page 24-25) before doing rep ...
Mirrors
Keep the inside and outside mirrors
clean and adjusted for best visibility.
Be sure to adjust the mirrors before
you start driving.
The inside mirror has day and night
positions. The night p ...