 Honda Accord: Synchro Sleeve and Hub Inspection and
Reassembly
1. Inspect the gear teeth on all synchro hubs and synchro sleeves for wear (rounded off corners).
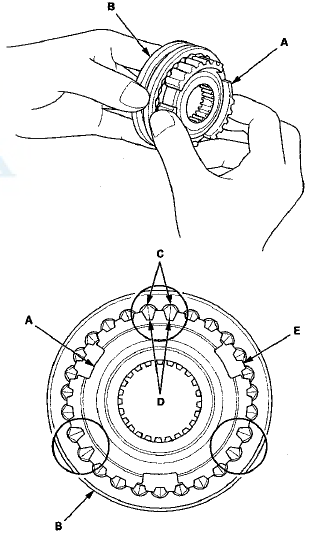
2. Install each synchro hub (A) in its mating synchro sleeve (B), and check for free movement. Make sure to match the three sets of longer teeth (C) (120 degrees apart) on the synchro sleeve with the three sets of deeper grooves (D) in the synchro hub.
NOTE: - Do not install the synchro sleeve with its longer teeth in the 1st/2nd and 5th synchro hub slots (E) because it will damage the spring ring.
- If replacement is required, always replace the synchro sleeve and the synchro hub as a set.

 Countershaft Reassembly
Exploded View
*: The components of the triple cone synchro assembly.
Special Tools Required
-–°—õDriver Handle, 40 mm I.D. 07746-0030100
- Bearing Driver Attachment, 30 mm 07746-0030300
NOTE: R ...
 Synchro Ring and Gear Inspection
1. Inspect the synchro rings for scoring, cracks, and
damage (A).
Example of synchro ring teeth
2. Inspect the inside of each synchro ring (B) for wear.
Inspect the ...
See also:
Engine Number
a. Engine Type
K24Z2: 2.4 L DOHC i-VTEC Sequential Multiport
Fuel-injected, 177HP engine
K24Z3: 2.4 L DOHC i-VTEC Sequential Multiport
Fuel-injected, 190HP engine
b. Serial Number
1000001 -–≤– ...
Checking Seat Belt Fit
To determine if a lap/shoulder belt
properly fits a child, have the child
put on the seat belt, then ask
yourself:
1. Does the child sit all the way back
against the seat?
2. Do the child‚ ...
XM Radio Display Messages
‘‘LOADING’’ - XM is loading the
audio or program information.
‘‘OFF AIR’’ - The channel currently selected is no
longer
broadcasting.
‘‘UPDATING’’ - The encryption code ...
