 Honda Accord: Side Impact Sensor (Second) Replacement
4-Door
Removal
1. Do t h e b a t t e r y t e r m i n a l d i s c o n n e c t i o n procedure (see page 22-91), t h e n w a i t at least 3 m i n u t e s before s t a r t i ng work.
2. Remove t h e seat s i de bolster (see page 20-242).
3. Disconnect t h e SRS f l o o r w i r e harness 2P c o n n e c t o r (A) f r om t h e s i de impact sensor (second) (B).
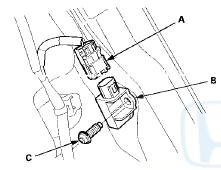
4. Remove t h e TORX bolt (C) u s i n g a TORX T30 b i t , t h en remove t h e s i de i m p a c t sensor (second).
Installation
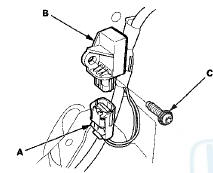
1. Install t h e s i d e impact sensor (second) (A) w i t h a n e w TORX bolt (B), u s i n g a TORX T30 bit. Connect t h e SRS f l o o r w i r e harness 2P c o n n e c t o r (C) t o t h e s i de impact sensor (second).
2. Do t h e b a t t e r y t e r m i n a l reconnection procedure (see page 22-91).
3. Clear a n y DTCs w i t h t h e HDS (see page 24-38).
4. C o n f i rm proper SRS o p e r a t i o n : T u r n t h e i g n i t i on s w i t c h t o O N (II); t h e SRS indicator s h o u l d come on f o r about 6 seconds and t h e n g o off.
5. Reinstall all r e m o v e d parts.
2-Door
Removal
1. Do t h e battery t e r m i n a l disconnection procedure (see page 22-91), t h e n w a i t at least 3 m i n u t e s before s t a r t i ng work.
2. Remove t h e rear s i d e t r im panel (see page 20-127).
3. Disconnect t h e SRS f l o o r w i r e harness 2P connector (A) from the side impact sensor, (second) (B).
4. Remove t h e TORX b o l t (C) u s i n g a TORX T30 b i t , t h en remove t h e side impact sensor (second).
Installation
1. Install t h e s i de impact sensor (second) (A) w i t h a n ew TORX bolt (B), u s i n g a TORX T30 bit. Connect t h e SRS f l o o r w i r e harness 2P connector (C) t o t h e side impact sensor (second).
2. Do t h e battery t e r m i n a l reconnection procedure (see page 22-91).
3. Clear any DTCs w i t h t h e HDS (see p a g e 24-38).
4. C o n f i rm proper SRS o p e r a t i o n : T u r n t h e i g n i t i on s w i t c h t o O N (II); t h e SRS indicator s h o u l d c o m e on f o r about 6 seconds a n d t h e n g o off.
5. Reinstall all r e m o v e d parts.
 Side Impact Sensor (First) Replacement
4-Door
Removal
1. Do t h e battery t e r m i n a l d i s c o n n e c t i o n procedure (see
page 22-91), t h e n w a i t at least 3 m i n u t e s before
s t a r t i ng work.
2. Remove t h e B-p ...
 Rear Safing Sensor Replacement
Removal
1. Do the battery t e r m i n a l disconnection p r o c e d u r e (see
page 22-91), t h e n wait at least 3 minutes before
starting w o r k .
2. Remove t h e rear seat c u s h i o n (see ...
See also:
Introduction
The following pages provide
instructions on how to properly
protect the driver, adult passengers,
and teenage children who are large
enough and mature enough to drive
or ride in the front.
...
Glove Box Lock Cylinder Replacement
NOTE: Take care not to scratch the glove box.
1. Remove the glove box (see page 20-174).
2. While lifting the glove box handle (A), pull out one
end of the retainer (B) with a hook-shaped tool ...
Lift and Support Points
NOTE: If you are going to remove heavy components
such as suspension or the fuel tank from the rear of the
vehicle, first support the front of the vehicle with tall
safety stands. When substantial ...