 Honda Accord: Rocker Arm and Shaft inspection
1. Remove the rocker arm assembly (see page 6-81).
2. Disassemble the rocker arm assembly (see page 6-82).
3. Measure the diameter of the shaft at the first rocker location.
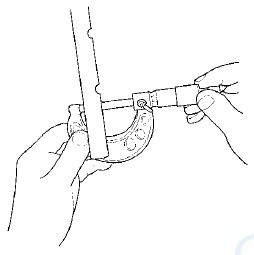
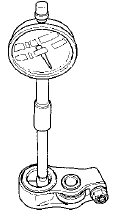
4. Zero the gauge (A) to the shaft diameter.

5. Measure the inside diameter of the rocker arm, and check it for an out-of-round condition.
Rocker Arm-to-Shaft Clearance
Standard (New): 0.018-”0.059 mm (0.0007-0.0023 in)
Service Limit: 0.08 mm (0.003 in)
6. Repeat for all intake rocker arms and intake shaft. If the clearance is beyond the service limit, replace the rocker shaft and all out of service limit rocker arms. If any VTEC rocker arm needs replacement, replace the intake rocker arms (primary, mid, and secondary), as a set.
7. Repeat for all exhaust rocker arms and exhaust shaft.
If the clearance is beyond the service limit, replace the rocker shaft and all out of service limit rocker arms. If any VTEC rocker arm needs replacement, replace the exhaust rocker arms (primary and secondary), as a set.
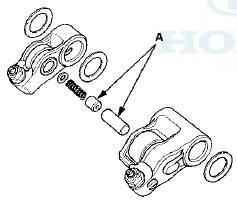
8. Inspect the rocker arm pistons (A). Push on each piston manually. If it does not move smoothly, replace the rocker arm set.
NOTE: Apply new engine oil to the rocker arm pistons when reassembling.
Intake side
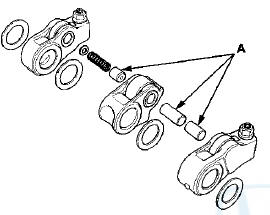
Exhaust side
9. Reassemble the rocker arm assembly (see page 6-82).
10. Install the rocker arm assembly (see page 6-93).
 Rocker Arm and Shaft Disassembly/Reassembly
NOTE:
- Identify each part as it is removed so that each item can be
reinstalled in its original locations,
a Inspect the rocker arm shaft and rocker arms (see page 6-83).
- I ...
 Camshaft Inspection
NOTE: Do not rotate the camshaft during inspection.
1. Remove the cylinder head (see page 6-76).
2. Disassemble the rocker arm assembly (see page
6-82).
3. Remove the rocker arm assembly (se ...
See also:
Change Lever Assembly Disassembly/Reassembly
NOTE: Prior to reassembling, clean all the parts in solvent, dry them, and
apply grease to contact surfaces as shown. Do
not wash the rubber parts with solvent.
...
Carpet Replacemen
Special Tools Required
KTC Trim Tool Set SOJATP2014*
*Available through the Honda Tool and
Equipment
Program; call 888-424-6857
One-piece Type Carpet (4-dВ©or)/Two-piece
Type Front Carpet (2- ...
Vanity Mirror
To use the vanity mirror on the back
of the sun visor, pull up the cover.
The vanity mirror lights come on
when you pull up the cover. ...