 Honda Accord: Rear Seat Removal/Installation
Seat-back
NOTE; Take care not to scratch the body or tear the seat covers.
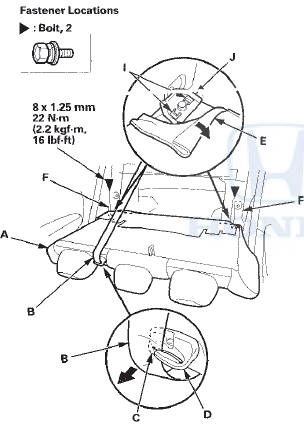
3.Remove the seat-back (A).
-1. Pull out the center seat belt (B) through the slit (C) in the seat belt guide (D).
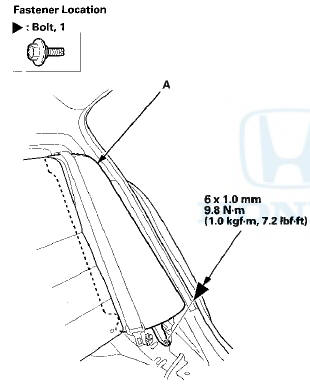
-2. 2-door; Pull out the seat-back cover (E) from between the seat-back and the trunk side trim panels (F), then remove the bolts.
-3.4-door: Release the Velcro fasteners (G), and pull back the seat-back cover (H), then remove the bolts.
-4. Release the hooks (!) of the pivot brackets (J).
2-door
4-door
4.2-door: Remove the rear side trim panel (see page 20-127).
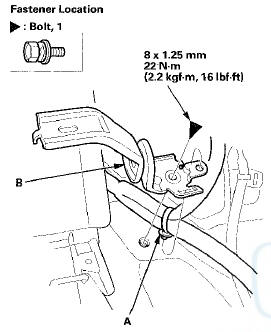
5. Detach the harness clip (A), and remove the bolt, then remove the pivot bracket (B). 4-door is shown; 2-door is similar.
6. Install the seat-back in the reverse order of removal, and note these items: - If the clip are damaged or stress-whitened, replace them with new ones.
- Push the clip and the hooks into place securely.
- Guide the center seat belt over the front of the seat-back as you install the seat-back.
- Make sure there are no twists or kinks in the center seat belt before attaching the rear seat-back.
Seat Cushion
NOTE: - Take care not to scratch the body or tear the seat covers.
- 4-door is shown; 2-door is similar.
1. Remove the bolt between the seat-back (A) and the seat cushion (B).
2. Pull up each front edge of the seat cushion (A) to release the hooks (B), then pull back the seat cushion, and remove it.
3. Install the seat cushion in the reverse order of removal, and note these items: - Make sure there are no twists or kinks in the seat belts before attaching the seat cushion.
- Slip the seat belt buckles through the slits in the seat cushion as you install it.
Seat Side Bolster - 4-door
SRS components are located in this area. Review the SRS component locations (see page 24-21) and the precautions and procedures (see page 24-25) before doing repairs or service.
NOTE; Take care not to scratch the body or tear the seat covers.
1. Remove the seat cushion.
2. Remove the bolt securing the seat side bolster (A).
3. Fold down the seat-back.
4. Lift up the seat side bolster (A) to release the hooks (B), then remove the side bolster.

5. Install the side bolster in the reverse order of removal, and note these items: - Guide the seat belts over the front of the seat side bolster as you install the bolster.
- Make sure there are no twists or kinks in the seat belts before attaching the seat side bolster.
 Front Seat Cushion Cover
Replacement
Front Seat Cushion Cover
Replacement
Special Tools Required
KTC Trim Tool Set SOJATP2014*
*Available through the Honda Tool and
Equipment
Program; call 888-424-6857
2-door
SRS components are located in this area. Review the
SRS c ...
 Rear Seat-back Latch Replacement
NOTE:
- Take care not to bend or scratch the interior trim.
- 4-door is shown; 2-door is similar.
1. Remove the rear shelf (see page 20-128).
2. Disconnect the seat-back release cable (A) fr ...
See also:
System Diagnostic Mode
Start-up procedure and Diagnostic IVieny
There are two ways t o enter the diagnostic mode:
Method 1 :
Start the vehicle. When the globe screen appears,
connect the SCS service connector (see page ...
Clutch Hose Replacement
NOTE:
- Replace the clutch hose if it is twisted, cracked, or
leaks.
- Use fender covers to avoid damaging painted
surfaces.
- Do not spill brake fluid on the vehicle; it may damage
the pain ...
Circuit Diagram
...