
 Honda Accord: Rear Door Latch Replacement
4-door
NOTE: Put on gloves to protect your hands.
1. Remove the door panel and the inner handle (see page 20-38).
2. Remove the plastic cover as needed (see step 3 on page 20-42).
3. Detach the rod fastener, and disconnect the outer handle rod from the outer handle base (see step 9 on page 20-44).
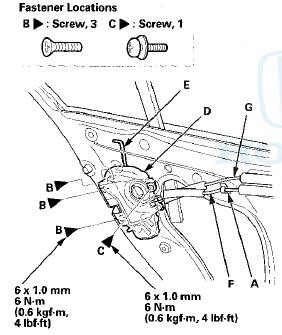
4. Detach the cable clip (A), and remove the screws (B, C) securing the latch (D), then remove latch through the hole in the door. Take care not to bend the outer handle rod (E), the latch cable (F), or the inner handle cable (G).
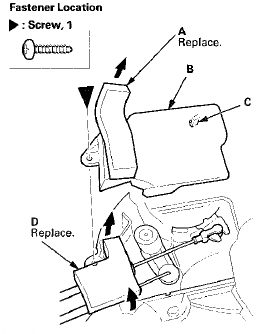
5. Remove the outside sponge seal (A), and remove the screw, then remove the latch protector (B) by releasing the hook (C), and remove the inside sponge seal (D) from the latch.
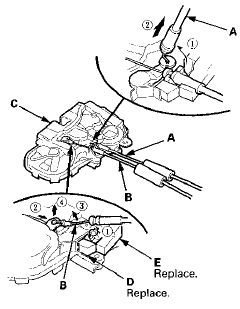
6. Disconnect the latch cable (A) and the inner handle cable (B) from the latch (C), and remove the inside sponge seals (D, E).
7. Install the latch in the reverse order of removal, and note these items; - If the clip is damaged or stress-whitened, replace it with a new one.
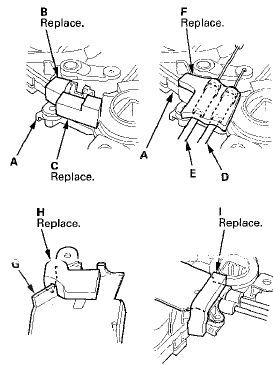
- Before reinstalling the cables to the latch (A), clean the latch surface where the sponge seals (B, C) will be attached with isopropyl alcohol, and attach the sponge seals to the latch as shown.
- After reinstalling the latch cable (D) and the inner handle cable (E) to the latch, attach the sponge seal (F) to the cable connecting areas on the latch as shown.
- Before reinstalling the latch protector (G), replace the inside sponge seal (H) and the outside sponge seal (I) with new ones: - Scrape off the old sponge seals from the protector, and clean the protector surfaces with isopropyl alcohol.
- Attach the inside sponge seal to the inside face of the protector as shown.
- After reinstalling the latch protector to the latch, attach the outside sponge seal to the protector and the latch as shown.
- Push the clip and the hook into place securely.
- Make sure the actuator connector is plugged in properly, and the outer handle rod is connected securely.
- Make sure the door locks and opens properly.
- When reinstalling the door panel, make sure the plastic cover on the door is installed properly .
 Rear Door Outer Handle Replacement
4-door
NOTE:
- Put on gloves to protect your hands.
- Take care not to scratch the door.
1. Remove the door panel (see page 20-38).
2. Disconnect the power door lock actuator connector
(A) ...
 Rear Door Glass and Regulator
Replacement
Rear Door Glass and Regulator
Replacement
4-door
NOTE: Put on gloves to protect your hands.
1. Remove the door panel (see page 20-38).
2. Disconnect the power door lock actuator connector
(A), and detach the harness clips (B). Remove ...
See also:
Voice Control System
On models with navigation system
The climate control system for your
vehicle can also be operated using
the voice control system. See the
navigation system manual for
complete details. ...
Power Transistor Test
1. Remove the passenger's dashboard undercover (see
page 20-170).
2. Disconnect the 4P connector from the power
transistor.
3. Measure the resistance between terminals No. 3 and
No. 4 of the ...