 Honda Accord: Oil Pan Remowal
1. If the engine is already out of the vehicle, go to step 19.
2. Remove the strut brace (if equipped) (see page 20-306).
3. Do the battery removal procedure (see page 22-92).
4. Remove the air cleaner assembly (see page 11-332).
5. Remove the harness clamps, then remove the battery base (see step 8 on page 5-3).
6. Remove the front engine mount stop (A), then remove the front engine mount bolt (B).
7. Loosen the rear engine mount mounting bolts (A),
M/T model
A/T model
8. Loosen the upper transmission mount bracket mounting bolts (A).
8VS/T model
A/T model
9. Raise the vehicle on the lift.
10. Remove the left front wheel.
11. Remove the splash shield (see step 25 on page 5-5).
12. Drain the engine oil (see page 8-11).
13. Separate the left side knuckle from the lower arm (see step 5 on page 18-21).
14. Remove the left side damper fork (see step 3 on page 18-21).
15. Remove the left side driveshaft (see page 16-4). Coat all precision-finished surface with new engine oil. Tie a plastic bag over the driveshaft end.
16. Remove the nuts securing the lower transmission mount (see step 49 on page 5-9).
17. A/T model: Remove the shift cable bracket.
- Vlehicles with JHM VINs (see step 46 on page 14-200).
- Vehicles with 1 HG VINs (see step 48 on page 14-200).
18. Use a transmission jack to lift the transmission 30-40 mm (1.2-1.6 in).
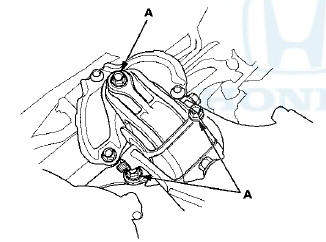
19. Remove the clutch/torque converter cover (A), and remove the two bolts securing the transmission.
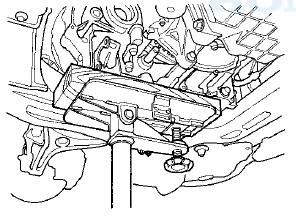
20. Remove the bolts securing the oil pan.
21. Using a flat blade screwdriver, separate the oil pan from the engine block in the places shown.
22. Remove the oil pan.
 Connecting Rod Bearing Replacement
Connecting Rod Bearing Clearance Inspection
1. Remove the oil pump (see page 8-17).
2. Remove the baffle plate (see step 8 on page 7-14).
3. Remove the connecting rod cap and the bearing half.
...
 Crankshaft and Piston Remowal
1 Remove the engine/transmission (see page 5-3).
2. Remove the transmission:
- Manual transmission (see page 13-7)
m Automatic transmission (see page 14-194)
3. M/T model: Remove the flywheel (s ...
See also:
Low Oil Pressure Indicator Circuit Diagram
...
Driver's Dashboard Lower Cover
Removal/Installation
Special Tools Required
KTC Trim Tool Set SOJATP2014*
* Available through the Honda Tool and
Equipment
Program; call 888-424-6857
NOTE;
- Take care not to scratch the dashboard or the related
p ...
Rear Bumper Removal/Installation
NOTE:
- Have an assistant help you when removing and
installing the rear bumper.
- Take care not to scratch the rear bumper or the body.
- Put on gloves to protect your hands.
- When prying ...