 Honda Accord: Oil Jet Replacement
1. Remove the oil pump (see page 8-17).
2. Remove the baffle plate (see step 8 on page 7-14).
3. Remove the oil jet bolts (A), then remove the oil jets (B).
4. Carefully install the oil jets, and tighten the oil jet bolts.
5. Install the baffle plate (see step 25 on page 7-29).
6. Install the oil pump (see page 8-23).
Oil Jet Inspection
1. Remove the oil jet (see page 8-14), and inspect it as follows.
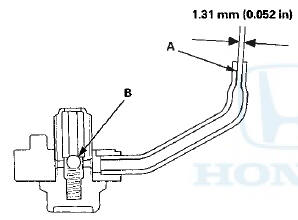
- Make sure that a 1.2 mm (0.05 in) diameter drill will go through the nozzle hole (A) (1.31 mm (0.052 in) diameter).
- Insert the other end of a 1.9 mm (0.07 in) drill into the oil intake (2.0 mm (0.079 in) diameter). Make sure the check ball (B) moves smoothly and has a stroke of about 2.0 mm (0.079 in).
- Check the oil jet operation with an air nozzle. It should take at least 325 kPa (3.9 kgf/cm2,47psi) to unseat the check ball.
NOTE: Replace the oil jet assembly, if the nozzle is damaged or bent.
2. Carefully install the oil jet. The mounting torque is critical.
Specified Torque: 16 N-m (1.6 kgf-m, 12 Ibfft)
 Engine Oil Gallery Cap Replacement
1. Remove the harness bracket (A), then remove the
engine oil gallery cap (B).
2. Clean the O-ring groove and mating surface with the
engine oil gallery cap.
3. Apply new engine oil to new O-r ...
 Oil Pump Overhaul
Exploded View
Oil Pump Removal
1. Turn the crankshaft pulley so its top dead center (TDC)
mark (A) lines up with the pointer (B).
NOTE: The other pointer (C) is not used.
2. Remove the oil ...
See also:
Crankshaft Pulley Removal and Installation
Special Tools Required
Handle, 6-25-660L 07JAB-001020B
Crankshaft Pulley Holder 07AAB-RJAA100
Socket, 19 mm 07JAA-001020A or equivalent
Removal
1 . Remove the front wheels.
2. Remove the splas ...
Dashboard/Steering Hanger Beam
Removal/Installation
Special Tools Required
KTC Trim Tool Set SOJATP2014*
*Available through the Honda Tool and Equipment
Program; call 888-424-6857
SRS components are located in this area. Review the
SRS component l ...