 Honda Accord: Moonroof Control Unit input Test
NOTE; If the moonroof works OK manually, but will not work in AUTO, or reverses frequently (obstacle detection), reset the moonroof (see page 22-371) before proceeding with the input test 1. Turn the ignition switch to LOCK (0).
2. Remove the headliner (see page 20-140).
3. Disconnect the 14P connector (A) from the moonroof control unit/motor (B).

4. Inspect the connector and socket terminals to be sure they are all making good contact.
• If the terminals are bent, loose or corroded, repair them as necessary, and recheck the system.
• If the terminals look OK, go to step 5.
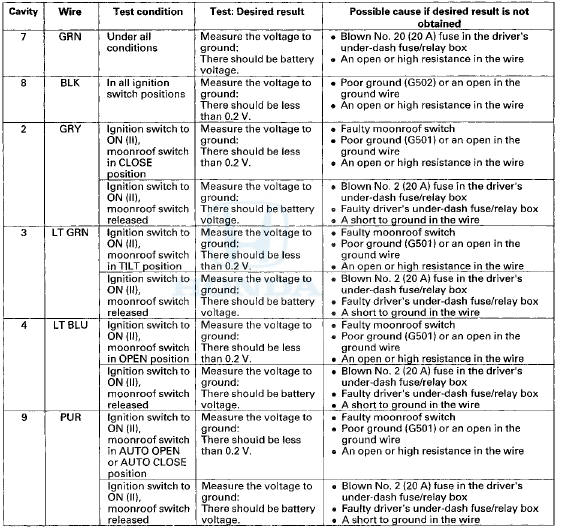
5. With the connector still disconnected/do these input tests at the following connector.
• If any test indicates a problem, find and correct the cause, then recheck the system.
• If all the input tests prove O K , go to step 6.
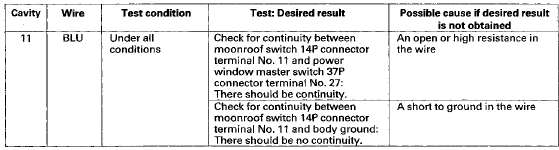
6. Reconnect the connector to the control unit and do these input tests at the following connector.
• If any test indicates a problem, find and correct the cause, then recheck the system.
• If all the input tests prove OK, go to step 7.
7. If all the input tests are OK and multiple failures are found, replace the moonroof control unit/motor assembly (see page 20-96). If the problem is related to the key-off operation, go to the driver's MICU input test (see page 22-176), and passenger's MICU input test (see page 22-180).
 Circuit Diagram
...
 Moonroof Switch Test/Replacement
1. Remove the front Individual map lights (see page
22-258).
2. Disconnect the moonroof switch 12P connector (A)
and map light 3P connector (B).
3. Remove the moonroof switch (C) from the map ...
See also:
Front Seat Belt Replacement
Front Seat Belt - 2-door
SRS components are located in this area. Review the
SRS component locations (see page 24-23) and the
precautions and procedures (see page 24-25) before
doing repairs or se ...
Valve, Spring, and Valve Seal Installation
Special Tools Required
Stem Seal Driver, 30 mm 07PAD-0010000
Valve Spring Compressor Attachment 07757-PJ1010A
1. Coat the valve stems with new engine oil. Install the
valves in the valve guides.
...
Headliner Removal/Installation
Special Tools Required
KTC Trim Tool Set SOJATP2014*
*Available through the Honda Tool and
Equipment
Program; call 888-424-6857
SRS components are located in this area. Review the
SRS component ...